Showing posts with label Blogging Tips. Show all posts
Sunday, 30 September 2012

How Blogging Works

Comments


I haven't updated my blog in a couple of days due to some offline endeavors but i'm happy to announce that i'm back to blogging full time. While i was gone i always made it a point of duty to check my daily statistics and see how many page views i get daily without updating my blog and i was shocked to see that on an average i get about 10,000 people from across the globe reading my blog Infobizz9ja. While its good to have a high amount of traffic its sad to see that despite the high amount of traffic infobizz9ja gets people don't know what to do when they visit the blog. To this effect i have taken it upon myself to explain to you reading this post right now how blogging works.

Firstly a weblog or a blog is more or less a public online dairy where the blog author (Blogger) shares posts about topics that interests him/her. I am interested in new music, online wealth creation, Information, tech stuffs just to mention a few. I am not interested in Gossip if you are looking for gossip i can direct you to a few blogs whose niche is gossip e.g Linda Ikeji, Kanyinulia e.t.c

Secondly a blog with a high traffic gets a good page rank on Google & is rated highly on Alexa and while all that is good it doesn't amount to much when the page viewers do not drop comments on the blog thereby making the blog seem empty. Some bloggers complain that they have good traffic yet people simply visit their blog, read their posts, download music tracks and cannot say a little thank you for constantly updating the blog & keeping it fresh daily. The nest time you visit a blog just before exiting the page drop a little note such as 'Nice Post' that would go a long way to show that you appreciate the amount of work that goes into Blogging.

Also, one thing that people have come to learn over time by visiting blogs is the advertisements being placed all over the blog. Advertisement is one of the ways by which a blogger makes money from his/her blog provided that page viewers see the adverts and click on them. Anytime a page viewer clicks on an advertisement on a blog eg Addynamo, Adsense & Click ads he/she will be paid a certain amount into his/her account which will accrue over the course of the month and will be made available when the money reaches a specified threshold. Provided one's earning has reached the minimum specified threshold one can request for a payout and get paid here in Nigeria.

Thank you for reading this post here's just a summary of today's post: Whenever you visit a blog always endeavor to drop a comment, it brings a blog owner joy to know that people read and appreciate his blog, support a blogger by visiting/clicking on the advertisement slots on his/her blog and checking out what the advertisement is all about.

Don't forget to like, share and drop a comment.
[Continue reading]
Saturday, 21 April 2012

Protecting Your Website/Blog’s Content From Content Thefts

Comments

 Are you one of those bloggers or website owners that do your blogging work on your own without copying from other websites and don’t want anyone to copy what you worked on? I spoke to doncaprio sometimes ago and he said to me how he hates people copying his site content and most of all, get higher Google ranking than him that had sleepless nights trying to crack those content and almost run mad. He also told me that he too was just like that about two years back(copying other site’s content) but stopped last year. As for me, I hate people copying my site content. I am also guilty of copying site contents but I’ve stopped it. I know most people won’t like copycats copying their unique content. To start with, I see no wrong when people copy other site content and re-edit it with their own wordings. But what annoys me most is when some people copy exactly what as it is written. I purposely posted this entry to tell the haters of content thefts how they scare or arrest them. You can scare content thefts from copying your blog contents by adding copyright banners on your website or blog as a warning. Doing this will surely minimize the thieves. But most of them are stubborn and for the stubborn ones, you can report them to Digital Millennium Copyright Act also known as DMCA. I call them the “internet police”. DMCA will do justice by removing them from the Google adsense service (if you’re using it) and suspend your website if you are using blogger.com with an extra punishment that is removing you from the search engine if you continue.
To get copyrights banners for your website or blog, use any of the websites below:
Thank you for viewing Tripozia today we hope to see you another day. Please consider sharing this post below.
[Continue reading]
Friday, 20 April 2012

Where To Create an Header Logo Images/Graphics Without Background(Transparent Background Images)

Comments
Like me in the past, most of you will have problem creating your own image or logo for a webpage or anything without background. Today, I will give you a list of where you can design your own image that will contain no background. First of all, let me recommend this software to you for designing images without background that is transparent images. Paint.Net is a software like that of corel draw which you can use to create designs not only designs but designs without background(transparent background). The lists are as follows:
1. Cooltext
2. Flamingtext
3. Logomaker
4. Logosnap
5. Onlinelogomaker
If you have any problem using any of the above websites, please let us know by you leaving a comment below. Please also consider sharing this post.
[Continue reading]
Monday, 16 April 2012

Adding a Stylish Feedburner Email Form Below Blog Posts

Comments
To increase the number of your blog readers and subscribers, there’s need to include an email form somewhere in your blog layout. One of the most strategic positions that’s been proven to be effective is right under your blog posts. Including a styled feeedburner email subscription form along with social media buttons can go a long way in increasing the number of your feed subscribers. Apart from this, this widget can increase your facebook fans and twitter followers.
Below is how the widget should look like after adding it below your posts:

Before proceeding, you must have burnt your feed with feedburner and have the url ready. If you haven’t, register for feedburner with your google account and follow these steps:
1. Log in to feedburner and on the start page, burn your feed. If you’re on Blogger, your feed address should be http://your-site.com/feeds/posts/default and if you’re on WordPress, it’s http://your-site.com/feed
2. On the next page, configure the feed, give it your desired name and note the address. Follow the next couple of steps to activate the feed.
How to Add the Email / Social Media to Blogger
To add the widget below your blog posts:
1. Log in to blogger
2. Go to Template > Edit HTML (new blogger UI) or Design > Edit HTML (old blogger UI)
3. Check the “Expand Widget Templates” box
4. Search for <data:post.body/>
If you have more than one of this in your template and confused about which one to use, search for <div class='post-footer-line post-footer-line-1'/> instead.
5. Right below this, paste this code:

<b:if cond='data:blog.pageType == &quot;item&quot;'>
<style>
form.feedburner{
margin:20px 0 0;
display:block;
clear:both;
}
.dcstyle{
background:url(https://blogger.googleusercontent.com/img/b/R29vZ2xl/AVvXsEiSgb94O6q7QjDFooHauCFoT94i1yxnkHBaKswwZ-xtzhWAcpRaGG3xgGazcPuelgHnkRomr-EeqjGsPuoctUPV5q76Cyt9P8Uregj9NtMgseNHX4oAl5trCvn8QdKenwDbeEYDazOhf4oP/s400/email_icon.png) no-repeat scroll 4px center transparent;
padding:7px 15px 7px 35px;
color:#666;
font-weight:bold;
text-decoration:none;
border:1px solid #D3D3D3;
-moz-border-radius: 4px;
-webkit-border-radius: 4px;
border-radius: 4px;
-moz-box-shadow: 1px 1px 2px #CCC inset;
-webkit-box-shadow: 1px 1px 2px #CCC inset;
box-shadow: 1px 1px 2px #CCC inset;
}
.dcsubmit{
color:#666;
font-weight:bold;
text-decoration:none;
padding:6px 15px;
border:1px solid #D3D3D3;
cursor: pointer;
-moz-border-radius: 4px;
-webkit-border-radius: 4px;
-goog-ms-border-radius: 4px;
border-radius: 4px;
background: #fbfbfb;
background: -moz-linear-gradient(top, #fbfbfb 0%, #f4f4f4 100%);
background: -webkit-gradient(linear, left top, left bottom, color-stop(0%,#fbfbfb), color-stop(100%,#f4f4f4));
background: -webkit-linear-gradient(top, #fbfbfb 0%,#f4f4f4 100%);
background: -o-linear-gradient(top, #fbfbfb 0%,#f4f4f4 100%);
background: -ms-linear-gradient(top, #fbfbfb 0%,#f4f4f4 100%);
filter: progid:DXImageTransform.Microsoft.gradient( startColorstr=&#39;#FBFBFB&#39;, endColorstr=&#39;#F4F4F4&#39;,GradientType=0 );
background: linear-gradient(top, #fbfbfb 0%,#f4f4f4 100%);
}
#emailwidget-outer {
-moz-border-radius: 10px 10px 10px 10px;
-webkit-border-radius: 10px 10px 10px 10px;
-goog-ms-border-radius: 10px 10px 10px 10px;
border-radius: 10px;
background: none repeat scroll 0 0 transparent;
border: 1px solid #D3D3D3;
padding: 8px;
-moz-transition: all 0.3s ease-out;
-o-transition: all 0.3s ease-out;
-webkit-transition: all 0.3s ease-out;
-ms-transition: all 0.3s ease-out;
transition: all 0.3s ease-out;
width:480px;
}
#emailwidget-outer:hover{
background: none repeat scroll 0 0 #FFF;
-moz-box-shadow: 1px 1px 2px #CCC inset;
-webkit-box-shadow: 1px 1px 2px #CCC inset;
box-shadow: 1px 1px 2px #CCC inset;
}
#emailwidget-outer td{
padding:3px 0;
}
</style>
<center>
<div id='emailwidget-outer'>
<div id='emailwidget'>
<table style='border:none; margin: 0px 0px 0px 0px; padding: 0px 0px 0px 0px;' width='100%'>
<tbody>
<tr style='border:none; margin: 0px 0px 0px 0px; padding: 0px 0px 0px 0px;'>
<td align='left' style='border:none; margin: 0px 0px 0px 0px; padding: 0px 0px 0px 0px;'> <p style='color:#666; font-weight: bold; font-size: 22px; margin:0px 0px 5px 0px; '>Get free daily email updates!</p>
<form action='http://feedburner.google.com/fb/a/mailverify' class='feedburner' method='post' onsubmit='window.open(&apos;http://feedburner.google.com/fb/a/mailverify?uri=tripozia&apos;, &apos;popupwindow&apos;, &apos;scrollbars=yes,width=550,height=520&apos;);return true' style='margin: 0pt;' target='popupwindow'>
<input name='uri' type='hidden' value='tripozia'/>
<input name='loc' type='hidden' value='en_US'/>
<input class='dcstyle' name='email' onblur='if (this.value == &quot;&quot;) {this.value = &quot;Enter your email…&quot;;}' onfocus='if (this.value == &quot;Enter your email…&quot;) {this.value = &quot;&quot;}' type='text' value='Enter your email…'/>
<input alt='' class='dcsubmit' title='' type='submit' value='Submit'/>
</form>
</td>
<td style='border:none; margin: 0px 0px 0px 0px; padding: 0px 0px 0px 0px;'><p style='color:#666; font-weight: bold; font-size: 14px; margin:0px 0px 5px 0px; '>Follow us!</p>
<a href='http://feeds.feedburner.com/Tripozia' rel='nofollow' target='_blank' title='Suscribe to RSS Feed'><img src='https://blogger.googleusercontent.com/img/b/R29vZ2xl/AVvXsEhipstwwFkUzCjcmmshrdPWcgyQZmJrbv5bjEPOhPSVq4ChLt3J6I4UFr3ZVy3gWh5E39DurV9Vird4e1NYWnLMHqRCmyjgRBOqAZXuJH1LuXQXfs8pkAxa6XIsRH5Oq6wi-eX52TudelI/s1600/rss-30×43.png'/></a>
<a href='http://twitter.com/tripozia' rel='nofollow' target='_blank' title='Follow us on Twitter'><img src='https://blogger.googleusercontent.com/img/b/R29vZ2xl/AVvXsEhlxrPvw1MBs79gD4YbtZ1W8gidZvTTzjCW1N22tHyX9u3vSZWP1G_vlOs0ODCJ1jUAz67CUgbmkdc6FT9J7iPw-ewsklMpXDIUeVWekokaPOuybgQoeYU4KsO2crYfyzExDris7gdDeSM/s1600/twitter-30×43.png'/></a>
<a href='http://www.facebook.com/tripozia' rel='nofollow' target='_blank' title='Follow us on Facebook'><img src='https://blogger.googleusercontent.com/img/b/R29vZ2xl/AVvXsEhzZKvr8lOfqx-bt8nJpeHDkLn_3x_roRMxkiKqbhpYrozXVSAALRCSYL3Uj2Z3MN10VttS50GnmTZoBeK9dmN2evOdXqFZFT8OCG0mb7CzOaS1bRFtip7vYMrjtB8_YwljmbfTMF4GSco/s1600/facebook-30×43.png'/></a>
<a href='https://plus.google.com/117057621685038494865/' rel='nofollow' target='_blank' title='Follow us on Google+'><img src='https://blogger.googleusercontent.com/img/b/R29vZ2xl/AVvXsEjsWkBKUul-p_mL2OFfPk1QSMO4Zq_lwdz0f9o7NaVTL-GBB6HUSGvgTivOnnxO_qyMvJtejyPvpyVfUDx4NYudDyAUcqWqNfoh1BnOvC7RsBi31PiR4U76-t-8LOE19Mavj83dgfS2yqU/s1600/googleplus-30×43.png'/></a>
</td>
</tr>
</tbody></table>
<div align='right'><span style='font-style: italic; font-size: 8px; color: solid #ffffff;'><a href='http://www.tripozia.blogspot.com/2012/04/adding-stylish-feedburner-email-form.html' style='text-decoration: none;' target='_blank'><font color='#ffffff' decoration='none'>[Get this widget]</font></a></span></div>
</div></div>
</center>
</b:if>

Save your template and view your blog to see the new email subscription form below your blog posts.
Things to change in the code:
http://feedburner.google.com/fb/a/mailverify?uri=tripozia – You should replace this with your feedburner email subscription link. To get this, log in to feedburner, click on your feed. Then go to Publicize > Email Subscription. Activate and get the email subscription link under Subscription Link Code.
tripozia – Replace this with your feed title. You should also see this at the end of your subscription link url. Mine is tripozia as seen in this link: http://feedburner.google.com/fb/a/mailverify?uri=tripozia
http://feeds.feedburner.com/Tripozia – Replace this with your feedburner link.
http://twitter.com/tripozia – Replace with your twitter profile link
http://www.facebook.com/tripozia – Your facebook page or profile link here
https://plus.google.com/117057621685038494865/ – Replace with your Google+ profile link
Adding the Subscription Box to your WordPress Blog
If you can edit your single.php file, you should be able to place it below your blog posts but there’s an easier way to get this done.
- Download and install Post Layout plugin – this plugin lets you format your post pages the way you like.
- Go to Settings > Post Layout
- Paste the code in the box labelled After the Content


[Continue reading]
Monday, 2 April 2012

How To Notify Search Engine Each Time You Make a Post

Comments
One of the ways to generate traffic and also make your blog or website contents appear regularly on major search engines is by pinging your website, blog or feed with ping services. A ping is a mechanism by which a blog notifies a server that its content has changed. A signal is sent to one or more “ping servers,” which can then create a list of new material. Aggregators use results from ping servers to tell subscribers which items on their subscription lists have fresh material.


Pinging also lets the search engines know that you have updated your content. Search engines such as Google and Bing like fresh updated content and will give it higher ranking in the search results.
The bigger your ping list the higher the chances of receiving traffic from those sources,
Simply submit your your site or feed to these ping services when you update or add new content. You can submit your site by by copying your URL (The address at the top of the page that begins http:www.mywebsite.com.) and pasting it in the box the pinging service indicates.
If you use WordPress blog you can modify your ping list on the Control Panel, then Options, then Writing).
 
NOTE: In other to achieve maximum result it is highly advised you choose at least one pinging service, and be using it for all your pings, multiple submission of your blog or site URL may be seen as spamming.
List of some popular Ping Services


Ping-o-Matic!

Ping-O-Matic is a service to update different search engines that your blog has updated.

Blog Ping for Squidoo Lenses

A ping tool especially optimised for Squidoo Lenses, and and is for notifying the blogosphere when a lens is updated.

My Page Rank

Submit Free lets you submit your URL to 20 popular search engines from one MyPagerank.Net Google PageRank Checker – Check Google page rank Webmasters, monitor your webpage pagerank


Pingoat

Ping over fifty blog services instantly. Pingoat also has an XML-RPC server. Ping services like Technorati, newsgator,feedster..

Pingler.com

Blog and Ping Tool – Use Pingler.com to Drive Traffic your Blogs and Websites Use Pingler.com to Ping your Blogs and Websites in the best way possible!

PingMyBlog.com

PingMyBlog.com is a service which does the hard work for you. We notify all the major blog directories in one go so that everyone knows about your latest blogs. It will not work for some reason if you use the RSS field provided. It does work just fine if you only use the Name and URL fields only.

Autopinger

Automates Ping Blog and Podcast for Free

Feed Shark

Ping your blog, feed, or podcast for free!

Pingates

Blog pinger – Blog ping service Pingates is a service that pings or notifies a number of services that keep track of weblogs and publish them.

PING.IN

Blog and ping , Blog ping , ping , Blog Search , Speed Test , Rank

Feed Ping

Free Website and Blog Multiple Submission Service – FEED PING Website and Blog Multiple Feed Service

King Ping Your Blog

Update pinging services to get the best results from all the important search engines. It is all automatic, so set it up and forget about it.

Ping 4 Free: Free Blog Ping Service

This site offers a blog ping service that pings well over 100 tested and functioning blog directories (actually 133 at last update). You must register, but registration is totally free.

Syncr Ping Service

Syncr is a Service to Update Different Search Engines That Your Blog or Web Site Has Updated.
The above ping services havee been tested by both friends and me. However, you can look up the ping service links below:
http://blogsearch.google.com/ping/RPC2
http://1470.net/api/ping
http://api.feedster.com/ping
http://api.moreover.com/RPC2
http://api.moreover.com/ping
http://api.my.yahoo.com/RPC2
http://api.my.yahoo.com/rss/ping
http://bblog.com/ping.php
http://bitacoras.net/ping
http://blog.goo.ne.jp/XMLRPC
http://blogdb.jp/xmlrpc
http://blogmatcher.com/u.php
http://bulkfeeds.net/rpc
http://coreblog.org/ping/
http://mod-pubsub.org/kn_apps/blogchatt
http://www.lasermemory.com/lsrpc/
http://ping.amagle.com/
http://ping.bitacoras.com
http://ping.blo.gs/
http://ping.bloggers.jp/rpc/
http://ping.cocolog-nifty.com/xmlrpc
http://ping.blogmura.jp/rpc/
http://ping.exblog.jp/xmlrpc
http://ping.feedburner.com
http://ping.rootblog.com/rpc.php
http://ping.syndic8.com/xmlrpc.php
http://ping.weblogalot.com/rpc.php
http://ping.weblogs.se/
http://rcs.datashed.net/RPC2/
http://rpc.blogbuzzmachine.com/RPC2
http://rpc.blogrolling.com/pinger/
http://rpc.icerocket.com:10080/
http://rpc.newsgator.com/
http://rpc.technorati.com/rpc/ping
http://rpc.weblogs.com/RPC2
http://topicexchange.com/RPC2
http://trackback.bakeinu.jp/bakeping.php
http://www.a2b.cc/setloc/bp.a2b
http://www.bitacoles.net/ping.php
http://www.blogdigger.com/RPC2
http://www.blogoole.com/ping/
http://www.blogoon.net/ping/
http://www.blogpeople.net/servlet/weblogUpdates
http://www.blogroots.com/tb_populi.blog?id=1
http://www.blogshares.com/rpc.php
http://www.blogsnow.com/ping
http://www.blogstreet.com/xrbin/xmlrpc.cgi
http://www.mod-pubsub.org/kn_apps/blogchatter/ping.php
http://www.newsisfree.com/RPCCloud
http://www.newsisfree.com/xmlrpctest.php
http://www.popdex.com/addsite.php
http://www.snipsnap.org/RPC2
http://www.weblogues.com/RPC/
http://xmlrpc.blogg.de
http://xping.pubsub.com/ping/
Cheers!
[Continue reading]

WordPress Conditional Tags (And Snippets) for Beginners

Comments
One of the best features of the WordPress could be the conditional tags. It allows you to tell the code to act differently in specific situations. For example, you can check if the user is using Windows or Mac, and display different content based on the systems. You can also redirect to post if search query only returns single result. You name the situations, the conditional tags can recognize them all!
wordpress codes conditional tags WordPress Conditional Tags (And Snippets) for Beginners
Despite its flexibility on determining actions based on different situations, it’s also extremely easy to learn, and there are even tutorials and resources spread over the web for you to actually master it. That said, in this article we’ll go through a detailed introduction about the conditional tags, how they work and when to actually use them.
In the last section of the article we’ll also show 10 useful snippets for you to achieve the most with conditional tags, so get them all to make your WordPress site acts more intelligently to unique situations!

If (Statements)

With PHP if statements you can ask if something is true or false, 1 or 0. If your statement is true, your code will be executed, and if it’s false nothing will happen, depending on how you decide the actions in the conditional tags. Check out the example, and I’m sure you’ll understand what I’m talking about.
  1. <?php  
  2. if(10 == 10):  
  3.     echo 'This is true, and will be shown.';  
  4. endif;  
  5.   
  6. if(10 == 15):  
  7.     echo 'This is false, and will not be shown.';  
  8. endif;  
  9. ?>  
You can also use elseif which lets you add another statement, and else that will be executed if your first statement is false.
  1. <?php  
  2. if(10 == 11):  
  3.     echo 'This is false, and will not be shown.';  
  4. elseif(10 == 15):  
  5.     echo 'This is false, and will not be shown.';  
  6. else:  
  7.     echo 'Since none of the above is true, this will be shown.';  
  8. endif;  
  9. ?>  
That’s all you need to know about if statements for now, let’s get into WordPress conditional tags! However, if you want to dig deeper into PHP if statements, head over to php.net for reference.

How Conditional Tags Work?

When using the native WordPress function like is_home(), you simply ask WordPress if the user is currently on the home page or not. WordPress will then answer with 0 for no, and 1 for yes.
  1. <?php  
  2. if( is_home() ):  
  3.     echo 'User is on the homepage.';  
  4. else:  
  5.     echo 'User is not on the homepage';  
  6. endif;  
  7. ?>  
For a complete list over WordPress conditional tags you can visit their codex.

Combining statements

There are cases when you might want to check more than one statement. This is easily done by using AND and OR.
  1. <?php  
  2. if( is_home() AND is_page( 5 ) ):  
  3.     echo 'User is on the homepage, and the home pages ID is 5';  
  4. endif;     
  5.   
  6. if( is_home() OR is_page( 5 )):  
  7.     echo 'User is on the homepage or the page where the ID is 5';  
  8. endif;  
  9. ?>  

When To Use Conditional Tags?

Conditional tags are great when you want to change your content depending on the answers of question relevant to your site. Is the user logged in? Is she using Internet Explorer? Is there any post to be shown?
To get an example of conditional tags in use, we can look into Twenty Eleven’s (the standard theme in WP 3.2) index.php, line 20.
  1. <?php if ( have_posts() ) : ?>  
  2. ... posts ...  
  3. <?php else : ?>  
  4. ... search field ...  
  5. <?php endif; ?>  
This checks if there is any post to show, and if the answer is no, the search field is displayed.
Below is another example of WordPress conditional tags:
  1. if( is_admin() ):  
  2.     # User is administator  
  3. endif;  
  1. if( is_home() AND is_page('1') ):  
  2.     # The user is at the home page and the home page is a page with the ID 1  
  3. endif;  
  1. if( is_single() OR is_page() ):  
  2.     # The user is reading a post or a page  
  3. endif;  
  1. if( !is_home() AND is_page() ):  
  2.     # The user is on a page, but not the homepage  
  3. endif;  

10 Useful Conditional Tags

The conditional tags available in the WordPress codex page are pretty limited to the big parts of WordPress, like posts, pages and such. There are, however, a lot of small and useful statements available if you look around the web.

Check if user is logged in

This will be a handy snippet if you have a blog with users registered, as it checks whether your user is logged in or not.
  1. if ( is_user_logged_in() ):  
  2.     echo 'Welcome, registered user!';  
  3. else:  
  4.     echo 'Welcome, visitor!';  
  5. endif;  
[Source]

Show content if registration are opened / closed

A good snippet if you have user registration feature in your site, and you want to let visitors to know about whether the registrations are opened or closed.
  1. <?php if ( get_option('users_can_register'):  
  2.      echo 'Registrations are opened.';  
  3. else:  
  4.     echo 'Registrations are closed.';  
  5. endif;  
[Source]

Check if user is on a Mac or a PC

Want to provide specific content based on the Operating System that users are using? Here’s the snippet for you.
  1. ifstristr($_SERVER['HTTP_USER_AGENT'],"mac") ):  
  2.   echo 'Hello, I'm a Mac.'; 
  3. else: 
  4.   echo 'And I'm a PC.';  
  5. endif;  
[Source]

Disable Google Analytics for logged in users

If you are using Google Analytics and you only want to track the visitors other than your authors and writers, you can probably use this snippet to achieve the purpose. Be sure to change UA-XXXXXXX-X to your Google Analytics ID.
  1. <?php  
  2. // function for inserting Google Analytics into the wp_head  
  3. add_action('wp_footer''ga');  
  4. function ga() {  
  5.    if ( !is_user_logged_in() ): // íf user is not logged in  
  6. ?>  
  7.     <script type="text/javascript">  
  8.       var _gaq = _gaq || [];  
  9.       _gaq.push(['_setAccount''UA-XXXXXXX-X']); // insert your Google Analytics id here  
  10.       _gaq.push(['_trackPageview']);  
  11.       _gaq.push(['_trackPageLoadTime']);  
  12.       (function() {  
  13.         var ga = document.createElement('script'); ga.type = 'text/javascript'; ga.async = true;  
  14.         ga.src = ('https:' == document.location.protocol ? 'https://ssl' : 'http://www') + '.google-analytics.com/ga.js';  
  15.         var s = document.getElementsByTagName('script')[0]; s.parentNode.insertBefore(ga, s);  
  16.       })();  
  17.     </script>  
  18. <?php  
  19.    endif;  
  20. }  
  21. ?>  
[Source]

Check if post is custom post type

Using the conditional tag below you can check if the current post is in a specific custom post type, for example, books.
  1. <?php if ( is_singular( 'books' ) ):  
  2.     // This post is of the custom post type books.  
  3. endif; ?>  
[Source]

Redirect to post if search query only returns single result

Add this snippet to your WordPress theme‘s functions.php to redirect your search to post automatically when WordPress only returns a single search result.
  1. <?php  
  2. add_action('template_redirect''single_result');  
  3. function single_result() {  
  4.     if (is_search()) {  
  5.         global $wp_query;  
  6.         if ($wp_query->post_count == 1) {  
  7.             wp_redirect( get_permalink( $wp_query->posts['0']->ID ) );  
  8.         }  
  9.     }  
  10. }  
  11. ?>  
[Source]

Check if last post

The chances are if you’re using separators between your posts you probably don’t want to include it into the last post of the page. Include the conditional tag below into your loop where you want to display something only if it’s on the last post.
  1. <?php if( ($wp_query->current_post + 1) < ($wp_query->post_count) ) { ?>  
  2.     <div class="separator"></div>  
  3. <?php } ?>   
[Source]

Check if current user can…

There are times when you want to know the role of the users, for example you only want certain links (edit, etc) to be displayed for authors. The function current_user_can() works like what mentioned above, and here is the code:
  1. <?php  
  2. if( current_user_can('editor') ):  
  3.     // true if user is an editor  
  4. endif;  
  5. if( !current_user_can('administrator') ):  
  6.     // true if user is not admin  
  7. endif;  
  8. if( current_user_can('edit_posts') ):  
  9.     // true if user can edit posts  
  10. endif;  
  11. ?>  
[Source]

Disable Tinymce HTML editor for everyone but admin

Ever wanted to disable the Tinymce HTML editor for everyone but admin? Here’s the snippet for you.
  1. <?php  
  2. add_filter( 'wp_default_editor', create_function('''return "tinymce";') );  
  3. add_action( 'admin_head''disable_html_editor_wps' );  
  4. function disable_html_editor_wps() {  
  5.     global $current_user;  
  6.     get_currentuserinfo();  
  7.     if ($current_user->user_level != 10) {  
  8.         echo <style type="text/css">#editor-toolbar #edButtonHTML, #quicktags {display: none;}</style>;  
  9.     }  
  10. }  
  11. ?>  
[Source]

Check if user is coming from StumbleUpon

StumbleUpon is a great social media which is able to attract traffic to your site. Here’s a trick to attract the Stumblers: display a special message to welcome them by using the conditional tag below which checks if the user comes from StumbleUpon.
  1. <?php ifstrpos($_SERVER[HTTP_REFERER], "stumbleupon.com" ) == true ): ?>  
  2.     <div class="welcome-stumbleupon">  
  3.         <p>Hello StumbleUpon user!</p>  
  4.     </div>  
  5. <?php endif; ?>  
[Source]

Final words

Hopefully you found WordPress conditional tags to be as awesome as I do. It saves me tons of time while developing templates, not having to come up with my own statements.
Also make sure to take a look at the WordPress Codex to see what else can be done with it. Happy coding!
[Continue reading]
Sunday, 1 April 2012

The 5 Best New WordPress Plugins for 2012

Comments
No Doubts about it, there are some tested and working WordPress plugins out here that each WordPress user might as well have downloaded by now. Plugins like Akismet, Google XML Sitemap, and WP Super Cache are simply a few of the industry guidelines that more than once make the list of top WordPress plugins. At the same time even though 2012 is just a few months gone, there are some brand new plugins good to go for that every WordPress user should be rushing to download:
Wordpress+plugin The 5 Best New WordPress Plugins for 2012
1. Google Referrer Checker
This Plugin records each connection that points someone to your website so that all sites connected to you are indexed in Google. While Google finishes a decently exceptional work on its own of indexing sites for you, the accuracy rate isn’t all in all up to 100%, and this plugin encourages google to spot any of the sites that it might have missed.
2. Pinterest RSS Widget
Discuss taking the world by storm – Pinterest shot straight up the totem shaft in webpage prominence essentially overnight. Increasingly bloggers are floating towards letting their site lovers/readers “PIN” their posts with the intention that they will range a more extensive crowd, making it foremost to download the Pinterest RSS Widget. This plugin permits you to include the “Follow Me on Pinterest” button to the bottom of posts so that your followers can take after you without hardly lifting a finger.
3. Track that Stat
Each blogger knows that Traffic is the driving constrain behind your website’s good fortune. The Track that Stat plugin permits website admins to see their post’s activity stats in legit time so they are unvaryingly familiar with how successful (or unsuccessful) their website is at any given time. This is particularly imperative when you’re attempting to investigate information and see what requires upgrade and what’s doing well.
4. PageRank Button
Proportionately as paramount in characterizing website success as site traffic is your official PageRank. The PageRank Button mechanically demonstrates to you your PageRank within Google with the intention that you are aware of where Google is ranking you.
5. Outbrain
The Outbrain plugin automatically presents your best posts at the end of your articles to help manage individuals to alternate articles that might interest them within your website. The longer you would be able to keep folks on your website the more they tend to come back regularly and become regular readers and subscribers, producing this a no-brainer when it approaches downloading plugins.
WordPress always try to roll out new plugins, all planned to help you power the most use and success of your website. By maintaining your plugins you are equipped to boost your online presences achievement and nonstop enhance zones that are needing.
[Continue reading]
Friday, 30 March 2012

Top 4 Basic Requirements To Make Money Blogging in 2012

Comments
I wish to formally welcome you into the New Year 2012! Though I am doing this late, I decided to do it with a wonderful post which my Friend, Mohammad Mustafa Ahmedzai of Mybloggertricks made on “4 Fundamental Requirements To Make Money Blogging in 2012.” Mohammad did a wonderful job dropping this post because it will go a long way in shaping your mind on how to make money blogging in this new year! I have read them myself and feel I should break the tips to you!
Blogging is a technical skill that turns a layman into an entrepreneur if applied correctly. It doesn’t matter if you are a student, housewife or jobless, One great advice given to undergraduate students is to start learning blogging while in school, because by the time they will graduate their tiny blog would have become a revenue generating engine. Blogging is surely an art and it can work only if your strategies are practical and focused. Big internet marketers often launch blogs with the start of each new year so that they could multiply their current income. Creating more blogs is never a big challenge but creating your very first blog is. But before you may start a new blog or take any such decision, we would like to guide you throughout your journey so that you may emerge as a well established professional blogger.

The Top Four Fundamental Blogging Requirements

1. Build Up Your Skills
I will write a detailed post on “technical requirements for becoming a pro blogger” and here I will just give some highlights. Normally people who succeed with blogging are
1. Web Designers
2. Web developers
3. Internet Marketers
People with any of the above designations have always turned out a productive resource for blogosphere. As a web designer myself, I could have never enjoyed blogging if I lacked designing skills. A blogger is not just an English writer who publishes links to Google, he is the brain behind the content as well as the blog’s solid structure. To win the hearts of readers you must exhibit extra ordinary skills by presenting your posts in a professional way. You must design and maintain the blog regularly. A blog with dull grey look and layout is always a complete failure. You must make use of rich HTML, CSS3 and JavaScript effects to create web objects that may provide the best web interface to your visitors. Keeping a blog clean, easy to navigate and easy to search and read, demands designing skills on behalf of the author. Therefore you don’t just need to be an excellent writer to become successful blog author but you must also have basic design skills required to stand out the competition.
You can learn HTML and CSS within a month and start creating amazing objects using Jquery and JavaScript the very next month. I will share all these details in my next post.
2. Understand what Search Engine is
Of course everyone knows what a search engine is but if this is true then why do people fail in driving traffic while on contrary others are entertained with immense traffic significantly? Optimizing your blogs is not the end of the story, there is something without which you can never expect to compete those billion of web pages fed into Google, Yahoo and Bing every single day!
Search engines work on the principle: “Produce Quality Content, Publish it first and get Served Forever!”
1. Produce Quality Content:
This term is highly misinterpreted in blogosphere. Quality content is not just about writing lengthy big paragraphs with a word limit of 700-1000 words. Quality content in accordance with latest Google Panda guidelines stands for publishing unique content which must be fresh, latest and new. This is one reason why blogs like Techcrunch and mashable are so successful. They act more like news feeders. Search engines look eagerly for blogs that produce content relevant to the current time, happenings around the world, trends in technology and on going seasonal occasions.
We could have published this post without adding the word 2012 in the title but this single numeric value plays wonders in search engine results page (SERP).
2. Publish it first:
Never wait for someone else to publish a news if you heard it first. Always share tutorials and posts on latest developments.
For example: As soon as people heard about Google+, thousands of tutorials were published the very next day. This is how internet has become, it never waits for anything.
3. Get Served Forever:
One of the things that I practically experienced with search engines especially Google is that if you are the first one to break a news or share it online, Google will direct most of the relevant organic traffic towards you. We are still being served with valuable traffic Alhamdulillah for breaking the following news:
* Facebook Video Calling
* How To Join Google+?
* Undo Timeline
Note that news here means “Sharing it first”
3. Act like a Journalist
What does Journalist does? Of course his job is to keep himself informed with everything. You must subscribe Giant technology corporate blogs and sites for updates in the world of social media and online media or at least visit these sites once a day. What I do is visiting my favorite technology blogs daily and I also use Alexa toolbar which shares interesting headlines across the globe. You can create an igoogle homepage and add RSS feeds of blogs related to your niche so that you may remain updated with latest happenings.
4. Publish Multiple Posts Per Day
If you are posting just twice per week and expecting revenue, then its time that you must open you eyes and wake up from these failed tactics.
This is the magic tip I recommend to all. There is nothing that can build your blogging career overnight except this strategy of post frequency. You must read the tutorial carefully to understand this important demand of pro blogging.
[Continue reading]

New: Add Facebook Comments Box To Blogger Blogs

Comments
Note: If you wish to completely hide the blogger comments form then read Replace Blogger comments form With Facebook

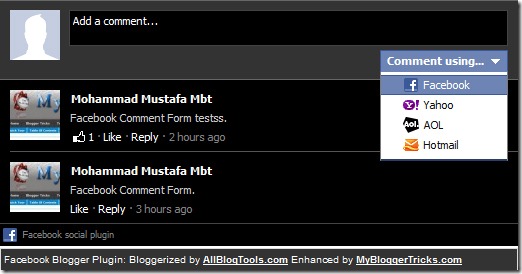
facebook-comments-boxIn 2009 Facebook developers introduced their best social plugin called “Facebook Comments Box“. This plugin can be embedded in any website or blog and visitors can use their IDs of Facebook, Yahoo, AOL or Hotmail to leave a comment at your site. This plugin did show a lot of problems when it was embedded in Blogger Blogs in initial days of its development but now thanks to our fellow friend Max from Allblogtools this plugin has been finally bloggerized to work just perfect with any Blogger hosted blogs. I have edited Max’s coding in some areas and have mentioned some more interesting options that will help you use the Facebook comments box in parallel to your old Blogger Comment form so that you may loose no previous comments and provide users with multiple options of commenting from different platforms.


Live Demo

This is how the Facebook Comments box looks like,
LIGHT SCHEME
facebook-commentS-box LIGHT
DARK SCHEME
Facebook-comments-dark-scheme
Interesting? Lets now learn how to embed this extremely useful comment form in Blogspot blogs. Kindly follow the simple steps below,

1- Get a Facebook Application ID

  1. Go To Facebook Developers Page
  2. Submit your blog URL and give it a name. Keep Site name as your “Blog Title” and Site URL as your “blog address”
site-url
3.   Hit “create app” button and proceed
4.   After submitting the security check code you will see this page,
app-id
5.   Save that App ID in a notepad because we will need that latter. Now Click the link near the top-right corner of the same page that says “Developer Dashboard
image
6.  One the new window that appears click the Edit Settings link ,
edit-settings
7.  Then go to Website option and write your Site Domain as blogspot
website
8.  Save Changes and jump to the next step of this tutorial

2- Adding the Facebook comments Box to Blogger

Now its time to do embed the comments box in your blog templates. So follow these easy steps,
PS: Please make sure your blogger comment form is embedded below posts. For doing this first go to Blogger > Settings > comments > and then choose embed comments below posts. After doing this follow the tutorial below.
  1. Go To Blogger > Design > Edit HTML
  2. Backup your template
  3. Check the “Expand Widget Templates” box
  4. Search for <html and just after it give a space and add this code,
xmlns:fb='http://www.facebook.com/2008/fbml'
  5.  Next search for
<body>
Note: In New Blogger Designed templates the same code looks like this,
<body expr:class='&quot;loading&quot; + data:blog.mobileClass'>
Find any one of these codes and just after it paste the code given below,
<div id=’fb-root’/>
<script>
window.fbAsyncInit = function() {
FB.init({
appId  : &#39;YOUR_APP_ID&#39;,
status : true, // check login status
cookie : true, // enable cookies to allow the server to access the   session
xfbml  : true  // parse XFBML
});
};
(function() {
var e = document.createElement(&#39;script&#39;);
e.src = document.location.protocol +   &#39;//connect.facebook.net/en_US/all.js&#39;;
e.async = true;
document.getElementById(&#39;fb-root&#39;).appendChild(e);
}());
</script>
  • Replace YOUR_APP_ID with your Facebook application ID that you saved in a notepad.
6.    Next search for  </head> and just above it paste the following code,
<meta expr:content=’data:blog.pageTitle’ property=’og:title’/>
<meta expr:content=’data:blog.url’ property=’og:url’/>
<meta content=’MY Blogger Tricks‘ property=’og:site_name’/>
<meta content=’BLOG-LOGO-IMAGE-LINK‘ property=’og:image’/>
<meta content=’YOUR_APP_ID ‘ property=’fb:app_id’/>
<meta content=’http://www.facebook.com/mybloggertricks‘ property=’fb:admins’/>
<meta content=’article’ property=’og:type’/>
Make these changes:
  • Replace MY Blogger Tricks with your blog title/Name.
  • Replace BLOG-LOGO-IMAGE-LINK with the image link of your logo. Your logo will look good if it is in gif format and having this size ->  40px by 40px . This logo will appear next to your post title on Facebook profiles of your visitors like this,
logo
  • Replace YOUR_APP_ID  with the your Facebook Application ID that you saved in notepad
  • Replace http://www.facebook.com/mybloggertricks with your Facebook user profile link
7.    Now Search for this,
<b:includable id=’comment-form’ var=’post’>
8.    Just after it paste the code given below,
<b:if cond=’data:blog.pageType == &quot;item&quot;’>
<div style=’padding:0px 0px 0px 0px; margin:0px 0px 0px 0px;’><script src=’http://connect.facebook.net/en_US/all.js#xfbml=1′/>
<div> <fb:comments  colorscheme=’light‘ expr:href=’data:post.url’ expr:title=’data:post.title’ expr:xid=’data:post.id’ width=’520′/></div>
<div style=’color:#fff; background-color:#3B5998;border: solid 1px #ddd; font-size:10px; padding:3px; width:510px;’>Facebook Blogger Plugin: Bloggerized by <b><a alt=’blogger templates’ href=’http://www.allblogtools.com/’ style=’text-decoration:underline; color:#fff;’ target=’_blank’ title=’blogger templates’>AllBlogTools.com</a></b> Enhanced by <b><a alt=’blogger widgets’ href=’http://www.mybloggertricks.com/’ style=’text-decoration:underline; color:#fff;’ target=’_blank’ title=’Blogger Widgets’>MyBloggerTricks.com</a></b></div></div>
</b:if>
  • If you want to use the dark scheme then simply replace light with dark
  • To change the Comments box size, change this value width=’520′
  • To change the footer credits size, change this value width:510px
  • Keep a difference of 10 pixels between the box size and footer size. For example if you set box-size to width=’600′ then set footer-size to width:590px
      9. Save your template and Bingo you are Done! See your blogs to find a beautiful comment box waiting to be touched. =)

Respect Copyright

This plugin contains credits to allblogtools and MBT blog for the efforts put by us in facilitating blogger users with this great commenting plugin. We therefore request you to please do not remove the footer credits. The credits are attached to the plugin in a design style that it perfectly blends the colour themes of Facebook Comments Box. We only need this favour in return.
[Continue reading]

Adding Background Color To Blogger Widget Title Bar

Comments
It has always been the desire of every blogger to make their blog eye friendly to their visitors. Tweaking your blog with new features and color designs will not only make your blog attractive, but encouraging to your visitors.
Recently, I got a message from a friend via Gmail, asking how he can Add a Colour Background frame for his gadget title.
There are different methods of doing this which I’ll be explaining below so take your time to read till the end.
In other to Add Color Background to your gadget title, you will have to change the Sidebar Title Background Color in your Html Template if you can not do it via Template Designer. But both methods has been provided for you and also how to use a customized image to make it more attractive and unique.
1st Method
1. Login to your Blogger Dashboard
2. Go to Layout > Edit Html.
3. Press CTRL+F and Search for sidebar h2 {
4. Then add background-color:#007788; just after the sidebar h2 {
5. After that it will look like this sidebar h2 {background-color:#007788
Note:You may not find sidebar h2 { Then Look for /* Sidebar Content Just below it add the following code .sidebar h2 {background-color:#007788;}
Note: Change the color code in red to your desired color in-order to match your blog design.
If you want to change main post gadget title background on blogger Look for
/* Headings
And add the following codes below it instead of the one above.
background:#007788;
2nd Method
1. Login to your Blogger Dashboard
2. Click on Design > Template Designer > Advanced (at your left side) scroll down and select > Add CSS > input the follow code below inside the box provided #Gadget ID h2 {background-color:#000000;}
You will have to change the color code in red to the color that matches your blogger template design.
If you want to apply color background on all gadget title, then use this code instead:
.widget h2 {background-color:#000000;}
3rd Method
This method is for those wishing to use image or picture as a Background to their Gadget Title.
All you have to do is, Design a picture or Image using Adobe Photoshop, Corel draw or any software you can use to design a picture.
Upload your image to Blogger and get the Image url, after doing these, follow the above step to to complete the bellow steps:
Use any one of the following code and paste in the provided box.
#Gadget ID h2 {background-image:url(‘YOUR IMAGE’);}
OR
.widget h2 {background-image:url(‘YOUR IMAGE’);}
Change the YOUR IMAGE to the image url you get earlier.
Save your changes clicking on Apply To Template.
Happy Blogging! Share!
[Continue reading]

How To Revert Back To Blogger Profile From Google+ Profile

Comments
It was late last year Google introduce a new features on blogger in reverting your blogger profile to Google+ profile with so many advantage but not everybody will be satisfied with this kind of updates.
Bellow I’ll be showing how to revert back to the blogger profile back. Now that you have your Google+ profile, it would be easier to manage things around.
The profile would act as one single page Google+ profile page that would portray you and your circles.
The revert link that will be provided would only work if you have switched over to Google+ profile from Blogger profile, obviously, How could you
revert something that you haven’t done.
Click the revert-profile link
then follow the next instructions there.
After the revert process has been done, a notification would appear on your Blogger Dashboard.

So that’s all.
Now you’re back on your blogger profile.
[Continue reading]
Thursday, 29 March 2012

How to Add Related Posts Below Your Blog Posts Using nRelate - Blogger

Comments
Adding related posts beneath your blog's post pages has been very effective for every blogger. This tutorial is on "How to add "nRelate" related posts widget to your blogs". "nRelate" related posts widget is very easy to customize according to your blog's color scheme. You can also decide whether to show thumbnails or simple links as your related posts. Follow the following steps to add "nRelate" related posts widget to your blogs.

Note: I recommend registering to nRelate in order to customize your widget.

How to add nRelate widget?


  1. Go to nRelate website and click Partner Login
  2. Now hover over Install button and click Blogger. A field would appear where you have to provide you blog link where you want to add nRelate widget. Then click submit.
  3. Now click Advance version (to be able to edit the plugin later)
  4. Next it would ask you whether you want to add it to your post pages only or on main blog page too, I recommend you add it to your post pages.
  5. Next it would open up a widget called Add page element. There are 2 sections. Click on the section that says Edit Content as shown below.
  6. You have to delete the code in Red as shown below.
<style type="text/css">@import url(http://static.nrelate.com/common_b/0.01.0/nrelate-panels-default.min.css);</style><div id='nrelate_related_placeholder'/></div>

Click Add Widget button and its all done. :) Hope that was easy to follow.
[Continue reading]
Saturday, 24 March 2012

Using Google Analytics On Your Blog

Comments
There are several free counters you can use to monitor traffic coming to your blog but only a few can equal google analytics in terms of detailed reporting. Google analytics is a free service provided by google to keep a track of your site or blog’s visitors. Using google analytics is quite helpful as it gives you an idea of what your visitors find interesting on your blog and areas you should make improvements. With google Analytics, you get to see almost real-time data about your site’s visitors. It’s even possible to track how much you’re earning from each of your blogs if you have more than one.
Google Analytics can provide you information about top search keywords relating to your site, referring websites and so on.
Installing google analytics on blogger is quite easy but you first have to sign up for the service with your google account.

Real-Time Traffic Stats
1. Log in to google analytics and create a new account for your blog.
2. Hit the sign up button on the next page and proceed to the next stage where you’re supposed to enter your website’s URL and account name.
3. Enter your contact information and proceed
4. Copy out the code generated on the next page
5. Log in to your blogger account and click on Design > Edit HTML
6. By pressi9ng CTRL + F on your keyboard, search for </head>
7. Just above this, paste the code you copied earlier in step 4 and save your template.
You just successfully installed google analytics code on your site and should start seeing tracking reports in your google analytics dashboard in about 24 hours.
[Continue reading]
Loading