Showing posts with label Blogger. Show all posts
Tuesday, 4 September 2012

How to Add Gadgets to Blogger's Mobile View

Comments
All blogspot users, if am not wrong really want a way they can edit their blogspot mobile view. This is one of the reasons why most blogspot users move to Wordpress because they allow their users to customize their mobile view using Mobilepress. Well, blogger has enabled this feature and I think all bloggers should be happy now.

Here on this tutorial, I will show you how you can customize the defaults widgets and add gadgets to your mobile site. Here are the default widgets on your mobile site:
  • Header
  • Blog
  • Adsense
  • PageList
  • Profile
  • Attribution 
You can customise your mobile template by adding the mobile='yes' on your widget tag in your HTML.
Other property attributes include, 'no', 'yes', and  'only'

If you want to hide a widget on the mobile site, just add the property mobile= with the attribute 'no' to its widget tag  (example:   mobile='no')

You will need to first of all change your mobile view to custom. Go to the Template page of your blogspot account click the settings for the mobile view. Set to Yes. Show mobile template on mobile devices. Choose mobile template and select custom then save. Check the picture below for guidiance


Now let's try to hide the profile widget otherwise gadget from showing on your mobile site.

This is the original code for the Profile widget tag: 
    <b:widget id='Profile1' locked='false' title='contributors' type='Profile'>


To hide it from showing in the mobile view add the attribute mobile='no' to its widget tag

    <b:widget id='Profile1' locked='false' mobile='no' title='contributors' type='Profile'>

 
Save your template and preview it with a phone.

You can do this for any widget you want to view on mobile. Insert 'yes' after mobile= to enable the gadget show the mobile view. Add 'only' to enable the gadget for mobile view only. You can ask questions by leaving a comment if you need help and please help us click the facebook share and twitter tweet button to share this post by saying thank you. God bless y'all
[Continue reading]
Friday, 31 August 2012

Adding Stylish Share Buttons to Your Blogger/Wordpress Blog's Post

Comments
Share buttons is very important for your blog as it helps in traffic and also makes your blog look more advanced. Are you looking for share buttons for your blog? Here's the spot.Before you continue, you can read one of my post of how you can add floating share buttons to your blog sidebar.

As you can see on the picture above the share button includes:
  • Facebook share button
  • Facebook like buttton
  • Tweet button
  • Pinterest button
  • Digg button
  • Stumbleupon button
Well this share button was gotten from sharethis.com but you may not like the way it appears whenever you use their Worpress plugin or their blogger gadget. Adding it manually gives you more flexibility because you can choose how and where you want the widget to appear.
You can also add more share buttons or customised it's look and feel by editing it's CSS. But let's get this done first.

Adding the share buttons to Bloggger / Blogspot
1. Log in to your Blogger account
2. Go to Template > Edit HTML
3. Click the box labelled “Expand Widget Template
4. Search for this:

</head>
5. Paste this code above it:

<script type="text/javascript" src="http://w.sharethis.com/button/buttons.js"></script>
<script type="text/javascript">stLight.options({publisher: "ur-47c9cca-cf33-f245-f3f6-43ed7a58f34f"}); </script> 
6. Now search for this:
 
<data:post.body/>
Note that you will have more than one of this if you’re using a magazine style template. You should keep trying them one after the other and check you blog each time you implement the code to know when it works.
7. Copy this code:
<b:if cond='data:blog.pageType == &quot;item&quot;'>
<style>
.tripozia-share-buttons
{
-webkit-border-radius: 5px;
-moz-border-radius: 5px;
border-radius: 5px;
border:1px solid #BBBBBB;
background-color:#FFFFFF;
-webkit-box-shadow: #B3B3B3 5px 5px 5px;
-moz-box-shadow: #B3B3B3 5px 5px 5px;
box-shadow: #B3B3B3 5px 5px 5px;
padding: 5px;
margin: 10px;
}
</style>
<p align='center' class='tripozia-share-buttons'>
<span class='st_facebook_hcount' displayText='Facebook'/>
<span class='st_plusone_hcount' displayText='Google +1'/>
<span class='st_twitter_hcount' displayText='Tweet'/>
<span class='st_pinterest_hcount' displayText='Pinterest'/>
<span class='st_digg_hcount' displayText='Digg'/>
<span class='st_stumbleupon_hcount' displayText='StumbleUpon'/>
<span class='st_fblike_hcount' displayText='Facebook Like'/>
</p>
</b:if>
If you want the buttons to appear above your posts, paste the code above <data:post.body/>.
If you prefer to have the share buttons just below your content, paste the code after <data:post.body/>.
You can as well put the code in both positions if you like.

Did you see the colored part of the code? That’s how the buttons are arranged. You can remove the ones you don’t like or change the arrangement.

Adding the share buttons to WordPress without a plugin
I’ll be explaining how to add these buttons to your blog’s regular theme and mobile version (Mobilepress precisely). The first part of the code goes into the head section of your theme. 1. Copy this code:
<script type="text/javascript" src="http://w.sharethis.com/button/buttons.js"></script>
<script type="text/javascript">stLight.options({publisher: "ur-47c9cca-cf33-f245-f3f6-43ed7a58f34f"}); </script>
And paste it in your head section. For genesis theme users, go to Genesis > Theme Settings > Header and Footer Scripts and paste the code. If you’re using any other WordPress theme, install Header and Footer plugin. Then go to Settings > Header and Footer > Code to be added on HEAD section of every page and paste the code there. If you want the buttons to appear on MobilePress, log in to cPanel file manager and navigate to …public_html/wp-content/plugins/mobilepress/system/themes/default/header.php. Edit your header.php and paste the code before the closing </head> tag.> 2. The second of the code requires Post Layout plugin to work. This plugin defines how your post looks like and what you want to put before, after and even in the middle of your content. You can even use it to add adsense codes but that’s another story. ;)Installed the plugin? Now go to Settings > Post Layout > Before the content and/or Before the content. Paste this code right there:
<style>
.tripozia-share-buttons
{
-webkit-border-radius: 5px;
-moz-border-radius: 5px;
border-radius: 5px;
border:1px solid #BBBBBB;
background-color:#FFFFFF;
-webkit-box-shadow: #B3B3B3 5px 5px 5px;
-moz-box-shadow: #B3B3B3 5px 5px 5px;
box-shadow: #B3B3B3 5px 5px 5px;
padding: 5px;
margin: 10px;
}
</style>
<p align='center' class='tripozia-share-buttons'>
<span class='st_facebook_hcount' displayText='Facebook'/>
<span class='st_plusone_hcount' displayText='Google +1'/>
<span class='st_twitter_hcount' displayText='Tweet'/>
<span class='st_pinterest_hcount' displayText='Pinterest'/>
<span class='st_digg_hcount' displayText='Digg'/>
<span class='st_stumbleupon_hcount' displayText='StumbleUpon'/>
<span class='st_fblike_hcount' displayText='Facebook Like'/>
</p>

That's all. If this post works perfectly on your blog, say thank you by sharing on Facebook or hitting the Google +1 button. Or if you have encountered problems implementing this tutorial please let me know.
[Continue reading]
Monday, 16 April 2012

Adding a Stylish Feedburner Email Form Below Blog Posts

Comments
To increase the number of your blog readers and subscribers, there’s need to include an email form somewhere in your blog layout. One of the most strategic positions that’s been proven to be effective is right under your blog posts. Including a styled feeedburner email subscription form along with social media buttons can go a long way in increasing the number of your feed subscribers. Apart from this, this widget can increase your facebook fans and twitter followers.
Below is how the widget should look like after adding it below your posts:

Before proceeding, you must have burnt your feed with feedburner and have the url ready. If you haven’t, register for feedburner with your google account and follow these steps:
1. Log in to feedburner and on the start page, burn your feed. If you’re on Blogger, your feed address should be http://your-site.com/feeds/posts/default and if you’re on WordPress, it’s http://your-site.com/feed
2. On the next page, configure the feed, give it your desired name and note the address. Follow the next couple of steps to activate the feed.
How to Add the Email / Social Media to Blogger
To add the widget below your blog posts:
1. Log in to blogger
2. Go to Template > Edit HTML (new blogger UI) or Design > Edit HTML (old blogger UI)
3. Check the “Expand Widget Templates” box
4. Search for <data:post.body/>
If you have more than one of this in your template and confused about which one to use, search for <div class='post-footer-line post-footer-line-1'/> instead.
5. Right below this, paste this code:

<b:if cond='data:blog.pageType == &quot;item&quot;'>
<style>
form.feedburner{
margin:20px 0 0;
display:block;
clear:both;
}
.dcstyle{
background:url(https://blogger.googleusercontent.com/img/b/R29vZ2xl/AVvXsEiSgb94O6q7QjDFooHauCFoT94i1yxnkHBaKswwZ-xtzhWAcpRaGG3xgGazcPuelgHnkRomr-EeqjGsPuoctUPV5q76Cyt9P8Uregj9NtMgseNHX4oAl5trCvn8QdKenwDbeEYDazOhf4oP/s400/email_icon.png) no-repeat scroll 4px center transparent;
padding:7px 15px 7px 35px;
color:#666;
font-weight:bold;
text-decoration:none;
border:1px solid #D3D3D3;
-moz-border-radius: 4px;
-webkit-border-radius: 4px;
border-radius: 4px;
-moz-box-shadow: 1px 1px 2px #CCC inset;
-webkit-box-shadow: 1px 1px 2px #CCC inset;
box-shadow: 1px 1px 2px #CCC inset;
}
.dcsubmit{
color:#666;
font-weight:bold;
text-decoration:none;
padding:6px 15px;
border:1px solid #D3D3D3;
cursor: pointer;
-moz-border-radius: 4px;
-webkit-border-radius: 4px;
-goog-ms-border-radius: 4px;
border-radius: 4px;
background: #fbfbfb;
background: -moz-linear-gradient(top, #fbfbfb 0%, #f4f4f4 100%);
background: -webkit-gradient(linear, left top, left bottom, color-stop(0%,#fbfbfb), color-stop(100%,#f4f4f4));
background: -webkit-linear-gradient(top, #fbfbfb 0%,#f4f4f4 100%);
background: -o-linear-gradient(top, #fbfbfb 0%,#f4f4f4 100%);
background: -ms-linear-gradient(top, #fbfbfb 0%,#f4f4f4 100%);
filter: progid:DXImageTransform.Microsoft.gradient( startColorstr=&#39;#FBFBFB&#39;, endColorstr=&#39;#F4F4F4&#39;,GradientType=0 );
background: linear-gradient(top, #fbfbfb 0%,#f4f4f4 100%);
}
#emailwidget-outer {
-moz-border-radius: 10px 10px 10px 10px;
-webkit-border-radius: 10px 10px 10px 10px;
-goog-ms-border-radius: 10px 10px 10px 10px;
border-radius: 10px;
background: none repeat scroll 0 0 transparent;
border: 1px solid #D3D3D3;
padding: 8px;
-moz-transition: all 0.3s ease-out;
-o-transition: all 0.3s ease-out;
-webkit-transition: all 0.3s ease-out;
-ms-transition: all 0.3s ease-out;
transition: all 0.3s ease-out;
width:480px;
}
#emailwidget-outer:hover{
background: none repeat scroll 0 0 #FFF;
-moz-box-shadow: 1px 1px 2px #CCC inset;
-webkit-box-shadow: 1px 1px 2px #CCC inset;
box-shadow: 1px 1px 2px #CCC inset;
}
#emailwidget-outer td{
padding:3px 0;
}
</style>
<center>
<div id='emailwidget-outer'>
<div id='emailwidget'>
<table style='border:none; margin: 0px 0px 0px 0px; padding: 0px 0px 0px 0px;' width='100%'>
<tbody>
<tr style='border:none; margin: 0px 0px 0px 0px; padding: 0px 0px 0px 0px;'>
<td align='left' style='border:none; margin: 0px 0px 0px 0px; padding: 0px 0px 0px 0px;'> <p style='color:#666; font-weight: bold; font-size: 22px; margin:0px 0px 5px 0px; '>Get free daily email updates!</p>
<form action='http://feedburner.google.com/fb/a/mailverify' class='feedburner' method='post' onsubmit='window.open(&apos;http://feedburner.google.com/fb/a/mailverify?uri=tripozia&apos;, &apos;popupwindow&apos;, &apos;scrollbars=yes,width=550,height=520&apos;);return true' style='margin: 0pt;' target='popupwindow'>
<input name='uri' type='hidden' value='tripozia'/>
<input name='loc' type='hidden' value='en_US'/>
<input class='dcstyle' name='email' onblur='if (this.value == &quot;&quot;) {this.value = &quot;Enter your email…&quot;;}' onfocus='if (this.value == &quot;Enter your email…&quot;) {this.value = &quot;&quot;}' type='text' value='Enter your email…'/>
<input alt='' class='dcsubmit' title='' type='submit' value='Submit'/>
</form>
</td>
<td style='border:none; margin: 0px 0px 0px 0px; padding: 0px 0px 0px 0px;'><p style='color:#666; font-weight: bold; font-size: 14px; margin:0px 0px 5px 0px; '>Follow us!</p>
<a href='http://feeds.feedburner.com/Tripozia' rel='nofollow' target='_blank' title='Suscribe to RSS Feed'><img src='https://blogger.googleusercontent.com/img/b/R29vZ2xl/AVvXsEhipstwwFkUzCjcmmshrdPWcgyQZmJrbv5bjEPOhPSVq4ChLt3J6I4UFr3ZVy3gWh5E39DurV9Vird4e1NYWnLMHqRCmyjgRBOqAZXuJH1LuXQXfs8pkAxa6XIsRH5Oq6wi-eX52TudelI/s1600/rss-30×43.png'/></a>
<a href='http://twitter.com/tripozia' rel='nofollow' target='_blank' title='Follow us on Twitter'><img src='https://blogger.googleusercontent.com/img/b/R29vZ2xl/AVvXsEhlxrPvw1MBs79gD4YbtZ1W8gidZvTTzjCW1N22tHyX9u3vSZWP1G_vlOs0ODCJ1jUAz67CUgbmkdc6FT9J7iPw-ewsklMpXDIUeVWekokaPOuybgQoeYU4KsO2crYfyzExDris7gdDeSM/s1600/twitter-30×43.png'/></a>
<a href='http://www.facebook.com/tripozia' rel='nofollow' target='_blank' title='Follow us on Facebook'><img src='https://blogger.googleusercontent.com/img/b/R29vZ2xl/AVvXsEhzZKvr8lOfqx-bt8nJpeHDkLn_3x_roRMxkiKqbhpYrozXVSAALRCSYL3Uj2Z3MN10VttS50GnmTZoBeK9dmN2evOdXqFZFT8OCG0mb7CzOaS1bRFtip7vYMrjtB8_YwljmbfTMF4GSco/s1600/facebook-30×43.png'/></a>
<a href='https://plus.google.com/117057621685038494865/' rel='nofollow' target='_blank' title='Follow us on Google+'><img src='https://blogger.googleusercontent.com/img/b/R29vZ2xl/AVvXsEjsWkBKUul-p_mL2OFfPk1QSMO4Zq_lwdz0f9o7NaVTL-GBB6HUSGvgTivOnnxO_qyMvJtejyPvpyVfUDx4NYudDyAUcqWqNfoh1BnOvC7RsBi31PiR4U76-t-8LOE19Mavj83dgfS2yqU/s1600/googleplus-30×43.png'/></a>
</td>
</tr>
</tbody></table>
<div align='right'><span style='font-style: italic; font-size: 8px; color: solid #ffffff;'><a href='http://www.tripozia.blogspot.com/2012/04/adding-stylish-feedburner-email-form.html' style='text-decoration: none;' target='_blank'><font color='#ffffff' decoration='none'>[Get this widget]</font></a></span></div>
</div></div>
</center>
</b:if>

Save your template and view your blog to see the new email subscription form below your blog posts.
Things to change in the code:
http://feedburner.google.com/fb/a/mailverify?uri=tripozia – You should replace this with your feedburner email subscription link. To get this, log in to feedburner, click on your feed. Then go to Publicize > Email Subscription. Activate and get the email subscription link under Subscription Link Code.
tripozia – Replace this with your feed title. You should also see this at the end of your subscription link url. Mine is tripozia as seen in this link: http://feedburner.google.com/fb/a/mailverify?uri=tripozia
http://feeds.feedburner.com/Tripozia – Replace this with your feedburner link.
http://twitter.com/tripozia – Replace with your twitter profile link
http://www.facebook.com/tripozia – Your facebook page or profile link here
https://plus.google.com/117057621685038494865/ – Replace with your Google+ profile link
Adding the Subscription Box to your WordPress Blog
If you can edit your single.php file, you should be able to place it below your blog posts but there’s an easier way to get this done.
- Download and install Post Layout plugin – this plugin lets you format your post pages the way you like.
- Go to Settings > Post Layout
- Paste the code in the box labelled After the Content


[Continue reading]
Friday, 30 March 2012

Blogger: Solution To Blogspot.com Addresses Redirecting To Country-Specific URLs.

Comments
If you have consistent online, you might have noticed that the URL of most Blogger blogspot.com addresses you’re reading has been redirected to a country-code top level domain, or ‘ccTLD.’ What this simply means is that if you’re in India and viewing [blogname].blogspot.com, you might be redirected [blogname].blogspot.com.in. A ccTLD, when it appears, corresponds with the country of the reader’s current location. Google thinks this is an interesting trick to defend Blogger blogs against local laws.

Why is Google doing this?
The Google team in an official statement reported the following as the reasons why they redirecting all Blogger blogspot.com addresses to country specific URLs:

Migrating to localized domains will allow us to continue promoting free expression and responsible publishing while providing greater flexibility in complying with valid removal requests pursuant to local law. By utilizing ccTLDs, content removals can be managed on a per country basis, which will limit their impact to the smallest number of readers. Content removed due to a specific country’s law will only be removed from the relevant ccTLD.”
What the above means is that [blogname].blogspot.com will continue to exist, but it’s not clear if the users from that specific country will still be able to access it.
Who is directly affected by this change?
The country specific URLs is affected by bloggers using the Blogger Free Sub-domain name (.blogspot.com) If you are using Blogger with a Custom domain name (.com), you are not affected. If you are blogging with the Blogger Free Sub-domain name(.blogspot.com), when a visitor from India visits your blog he or she will view your blog address as [blogname].blogspot.com.in instead of [blogname].blogspot.com. So when an Indian user visits your blog, he will be redirected to yourblog.blogspot.com. The person gets redirected to “[blogname].blogspot.com.in” which is India’s specific URL.
What is the SEO and Traffic Implications of this?
Since Blogger servers will be generating several ccTLDs for all your visitors who will be visiting your blog from different country locations, this will give rise to same content with different URLs. Search crawlers/spiders will find the same content on different domains and hence this could drastically lower or affect your search results and organic traffic. Your blog can also get penalized for promoting duplicate content with different domain names.
Lets say you blog at [blogname].blogspot.in ordinarily crawlers will find similar URLs promoting the content you publish with different names such as:
blog-name.blogspot.pk

blog-name.blogspot.in

blog-name.blogspot.au

blog-name.blogspot.ru

blog-name.blogspot.nr

and so on… Leading to

Duplicate content Detected!!

Blogger team, however has managed to put a little fix on this by adding to all Blogger template a Canonical Tag to help check the cases of content duplication.  If you check your templates coding you will find a new line of code added near the head section <head> of your template:
<link href=’http://blog-name.blogspot.com/’ rel=’canonical’/>
What is a canonical tag?
The canonical tag is a line of code or link that helps to alert crawlers to know that although the URLs are different, the content is the same. Blogger team added this tag following the fact that blogs sorts pages by categories and tags.
An example of this can be seen in these two links below having exactly the same content:
http://www.example.com/product.php?item=fish&trackingid=1567&sort=alpha&sessionid=5678asfasdf

http://www.example.com/product.php?item=fish&trackingid=1567&sort=price&sessionid=5678asfasdf
If you notice in the two links above, the only difference in them is the tags “alpha” and “price”. Now this is where the problems comes as Google robots will only consider the first link that it came across and when it finds the same content on another link, it will mark the content as duplicate and the blog will be marked as content duplicator and hence faces serious drop in traffic.
Since your Blogger blogspot.com domains will now contain several domain addresses in them, the canonical tag added to your template will tell spiders that though this blog has several different URL’s for the homepage or subpages but the content are same and not duplicates.
Now the above solves the problem of SEO and Traffic, what about viewing of your blog address?
You can temporarily prevent Blogger from doing the “country specific URL redirect” while viewing a blogspot blog by entering a specially formatted NCR URL to request a specific country version of the blogspot content without redirecting to your ccTLD. NCR stands for ‘No Country Redirect‘ This will always display [blogname].blogger.com in English, irrespective of where you viewing the blogspot blog. For example: http://[blogname].blogspot.com/ncr will always goes to the U.S. English blog.”
What You Can do Prevent ALL of These (My Advice)
In as much Blogger team has put a fix to this, there may not be long term promise that things would remain the same, that is why I would strongly suggest you buy a Custom domain name for your blog, that way you will be completely FREE from any future fallback.
How to Get a Custom Domain Name
Buying a custom domain name is very easy with Blogger. All you need do is sign into your blogger account >Settings > Basic > Publishing > Add a custom domain. The domain name will cost you $10. Usually your domain name will be registered by Godaddy.com, but Google helps you get to Godaddy through them so it can be cheaper.
I am a Nigerian and I don’t Have a Credit Card, plus I don’t know how to Set it Up
You are not alone! I have been helping most Nigerians register a domain name. All you need do is read my introductory post on Let Me Help Change Your Blogger Blogspot Address to .com Domain, and Make it Work the Same Day. Once you are done reading the post, everything would just be fine…
[Continue reading]

Blogger Application For Android And iPhone – Blogging On The Go

Comments
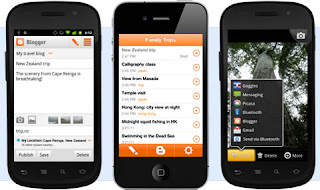
Blogger has made it possible for all Android and iPhone user to blog with their phone with the use of Blogger Application
With this application you can make a new post, attach images, including location, publish to your blog, save as draft, send via Bluetooth to friends and email to friends and many other feature.
Features Of Blogger App
Post to your blog from
anywhere

Instantly publish posts to your blog or save them as drafts.
List view
Quickly navigate to blog posts and drafts from an easy-to-read list.
Attach photos
Include photos in your blog post by taking a picture with your camera within the Blogger app or choosing one from your gallery.
Share your location
Select your current location from the My Location bar and add it to your post.
Share to Blogger
Send links and photos directly to your blog by selecting Blogger from the options menu of apps like your web browser and photo gallery.
Install Blogger App For Android
Install Blogger App For iPhone.
Hoping to see this kinda Blogger app for Nokia users too soon.
Consider sharing this post.
[Continue reading]

New: Add Facebook Comments Box To Blogger Blogs

Comments
Note: If you wish to completely hide the blogger comments form then read Replace Blogger comments form With Facebook

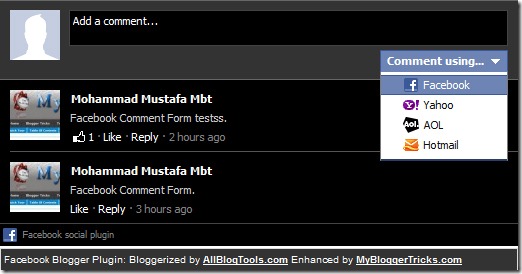
facebook-comments-boxIn 2009 Facebook developers introduced their best social plugin called “Facebook Comments Box“. This plugin can be embedded in any website or blog and visitors can use their IDs of Facebook, Yahoo, AOL or Hotmail to leave a comment at your site. This plugin did show a lot of problems when it was embedded in Blogger Blogs in initial days of its development but now thanks to our fellow friend Max from Allblogtools this plugin has been finally bloggerized to work just perfect with any Blogger hosted blogs. I have edited Max’s coding in some areas and have mentioned some more interesting options that will help you use the Facebook comments box in parallel to your old Blogger Comment form so that you may loose no previous comments and provide users with multiple options of commenting from different platforms.


Live Demo

This is how the Facebook Comments box looks like,
LIGHT SCHEME
facebook-commentS-box LIGHT
DARK SCHEME
Facebook-comments-dark-scheme
Interesting? Lets now learn how to embed this extremely useful comment form in Blogspot blogs. Kindly follow the simple steps below,

1- Get a Facebook Application ID

  1. Go To Facebook Developers Page
  2. Submit your blog URL and give it a name. Keep Site name as your “Blog Title” and Site URL as your “blog address”
site-url
3.   Hit “create app” button and proceed
4.   After submitting the security check code you will see this page,
app-id
5.   Save that App ID in a notepad because we will need that latter. Now Click the link near the top-right corner of the same page that says “Developer Dashboard
image
6.  One the new window that appears click the Edit Settings link ,
edit-settings
7.  Then go to Website option and write your Site Domain as blogspot
website
8.  Save Changes and jump to the next step of this tutorial

2- Adding the Facebook comments Box to Blogger

Now its time to do embed the comments box in your blog templates. So follow these easy steps,
PS: Please make sure your blogger comment form is embedded below posts. For doing this first go to Blogger > Settings > comments > and then choose embed comments below posts. After doing this follow the tutorial below.
  1. Go To Blogger > Design > Edit HTML
  2. Backup your template
  3. Check the “Expand Widget Templates” box
  4. Search for <html and just after it give a space and add this code,
xmlns:fb='http://www.facebook.com/2008/fbml'
  5.  Next search for
<body>
Note: In New Blogger Designed templates the same code looks like this,
<body expr:class='&quot;loading&quot; + data:blog.mobileClass'>
Find any one of these codes and just after it paste the code given below,
<div id=’fb-root’/>
<script>
window.fbAsyncInit = function() {
FB.init({
appId  : &#39;YOUR_APP_ID&#39;,
status : true, // check login status
cookie : true, // enable cookies to allow the server to access the   session
xfbml  : true  // parse XFBML
});
};
(function() {
var e = document.createElement(&#39;script&#39;);
e.src = document.location.protocol +   &#39;//connect.facebook.net/en_US/all.js&#39;;
e.async = true;
document.getElementById(&#39;fb-root&#39;).appendChild(e);
}());
</script>
  • Replace YOUR_APP_ID with your Facebook application ID that you saved in a notepad.
6.    Next search for  </head> and just above it paste the following code,
<meta expr:content=’data:blog.pageTitle’ property=’og:title’/>
<meta expr:content=’data:blog.url’ property=’og:url’/>
<meta content=’MY Blogger Tricks‘ property=’og:site_name’/>
<meta content=’BLOG-LOGO-IMAGE-LINK‘ property=’og:image’/>
<meta content=’YOUR_APP_ID ‘ property=’fb:app_id’/>
<meta content=’http://www.facebook.com/mybloggertricks‘ property=’fb:admins’/>
<meta content=’article’ property=’og:type’/>
Make these changes:
  • Replace MY Blogger Tricks with your blog title/Name.
  • Replace BLOG-LOGO-IMAGE-LINK with the image link of your logo. Your logo will look good if it is in gif format and having this size ->  40px by 40px . This logo will appear next to your post title on Facebook profiles of your visitors like this,
logo
  • Replace YOUR_APP_ID  with the your Facebook Application ID that you saved in notepad
  • Replace http://www.facebook.com/mybloggertricks with your Facebook user profile link
7.    Now Search for this,
<b:includable id=’comment-form’ var=’post’>
8.    Just after it paste the code given below,
<b:if cond=’data:blog.pageType == &quot;item&quot;’>
<div style=’padding:0px 0px 0px 0px; margin:0px 0px 0px 0px;’><script src=’http://connect.facebook.net/en_US/all.js#xfbml=1′/>
<div> <fb:comments  colorscheme=’light‘ expr:href=’data:post.url’ expr:title=’data:post.title’ expr:xid=’data:post.id’ width=’520′/></div>
<div style=’color:#fff; background-color:#3B5998;border: solid 1px #ddd; font-size:10px; padding:3px; width:510px;’>Facebook Blogger Plugin: Bloggerized by <b><a alt=’blogger templates’ href=’http://www.allblogtools.com/’ style=’text-decoration:underline; color:#fff;’ target=’_blank’ title=’blogger templates’>AllBlogTools.com</a></b> Enhanced by <b><a alt=’blogger widgets’ href=’http://www.mybloggertricks.com/’ style=’text-decoration:underline; color:#fff;’ target=’_blank’ title=’Blogger Widgets’>MyBloggerTricks.com</a></b></div></div>
</b:if>
  • If you want to use the dark scheme then simply replace light with dark
  • To change the Comments box size, change this value width=’520′
  • To change the footer credits size, change this value width:510px
  • Keep a difference of 10 pixels between the box size and footer size. For example if you set box-size to width=’600′ then set footer-size to width:590px
      9. Save your template and Bingo you are Done! See your blogs to find a beautiful comment box waiting to be touched. =)

Respect Copyright

This plugin contains credits to allblogtools and MBT blog for the efforts put by us in facilitating blogger users with this great commenting plugin. We therefore request you to please do not remove the footer credits. The credits are attached to the plugin in a design style that it perfectly blends the colour themes of Facebook Comments Box. We only need this favour in return.
[Continue reading]

Adding Background Color To Blogger Widget Title Bar

Comments
It has always been the desire of every blogger to make their blog eye friendly to their visitors. Tweaking your blog with new features and color designs will not only make your blog attractive, but encouraging to your visitors.
Recently, I got a message from a friend via Gmail, asking how he can Add a Colour Background frame for his gadget title.
There are different methods of doing this which I’ll be explaining below so take your time to read till the end.
In other to Add Color Background to your gadget title, you will have to change the Sidebar Title Background Color in your Html Template if you can not do it via Template Designer. But both methods has been provided for you and also how to use a customized image to make it more attractive and unique.
1st Method
1. Login to your Blogger Dashboard
2. Go to Layout > Edit Html.
3. Press CTRL+F and Search for sidebar h2 {
4. Then add background-color:#007788; just after the sidebar h2 {
5. After that it will look like this sidebar h2 {background-color:#007788
Note:You may not find sidebar h2 { Then Look for /* Sidebar Content Just below it add the following code .sidebar h2 {background-color:#007788;}
Note: Change the color code in red to your desired color in-order to match your blog design.
If you want to change main post gadget title background on blogger Look for
/* Headings
And add the following codes below it instead of the one above.
background:#007788;
2nd Method
1. Login to your Blogger Dashboard
2. Click on Design > Template Designer > Advanced (at your left side) scroll down and select > Add CSS > input the follow code below inside the box provided #Gadget ID h2 {background-color:#000000;}
You will have to change the color code in red to the color that matches your blogger template design.
If you want to apply color background on all gadget title, then use this code instead:
.widget h2 {background-color:#000000;}
3rd Method
This method is for those wishing to use image or picture as a Background to their Gadget Title.
All you have to do is, Design a picture or Image using Adobe Photoshop, Corel draw or any software you can use to design a picture.
Upload your image to Blogger and get the Image url, after doing these, follow the above step to to complete the bellow steps:
Use any one of the following code and paste in the provided box.
#Gadget ID h2 {background-image:url(‘YOUR IMAGE’);}
OR
.widget h2 {background-image:url(‘YOUR IMAGE’);}
Change the YOUR IMAGE to the image url you get earlier.
Save your changes clicking on Apply To Template.
Happy Blogging! Share!
[Continue reading]

How To Revert Back To Blogger Profile From Google+ Profile

Comments
It was late last year Google introduce a new features on blogger in reverting your blogger profile to Google+ profile with so many advantage but not everybody will be satisfied with this kind of updates.
Bellow I’ll be showing how to revert back to the blogger profile back. Now that you have your Google+ profile, it would be easier to manage things around.
The profile would act as one single page Google+ profile page that would portray you and your circles.
The revert link that will be provided would only work if you have switched over to Google+ profile from Blogger profile, obviously, How could you
revert something that you haven’t done.
Click the revert-profile link
then follow the next instructions there.
After the revert process has been done, a notification would appear on your Blogger Dashboard.

So that’s all.
Now you’re back on your blogger profile.
[Continue reading]
Thursday, 29 March 2012

How to Add Related Posts Below Your Blog Posts Using nRelate - Blogger

Comments
Adding related posts beneath your blog's post pages has been very effective for every blogger. This tutorial is on "How to add "nRelate" related posts widget to your blogs". "nRelate" related posts widget is very easy to customize according to your blog's color scheme. You can also decide whether to show thumbnails or simple links as your related posts. Follow the following steps to add "nRelate" related posts widget to your blogs.

Note: I recommend registering to nRelate in order to customize your widget.

How to add nRelate widget?


  1. Go to nRelate website and click Partner Login
  2. Now hover over Install button and click Blogger. A field would appear where you have to provide you blog link where you want to add nRelate widget. Then click submit.
  3. Now click Advance version (to be able to edit the plugin later)
  4. Next it would ask you whether you want to add it to your post pages only or on main blog page too, I recommend you add it to your post pages.
  5. Next it would open up a widget called Add page element. There are 2 sections. Click on the section that says Edit Content as shown below.
  6. You have to delete the code in Red as shown below.
<style type="text/css">@import url(http://static.nrelate.com/common_b/0.01.0/nrelate-panels-default.min.css);</style><div id='nrelate_related_placeholder'/></div>

Click Add Widget button and its all done. :) Hope that was easy to follow.
[Continue reading]
Saturday, 24 March 2012

Using Google Analytics On Your Blog

Comments
There are several free counters you can use to monitor traffic coming to your blog but only a few can equal google analytics in terms of detailed reporting. Google analytics is a free service provided by google to keep a track of your site or blog’s visitors. Using google analytics is quite helpful as it gives you an idea of what your visitors find interesting on your blog and areas you should make improvements. With google Analytics, you get to see almost real-time data about your site’s visitors. It’s even possible to track how much you’re earning from each of your blogs if you have more than one.
Google Analytics can provide you information about top search keywords relating to your site, referring websites and so on.
Installing google analytics on blogger is quite easy but you first have to sign up for the service with your google account.

Real-Time Traffic Stats
1. Log in to google analytics and create a new account for your blog.
2. Hit the sign up button on the next page and proceed to the next stage where you’re supposed to enter your website’s URL and account name.
3. Enter your contact information and proceed
4. Copy out the code generated on the next page
5. Log in to your blogger account and click on Design > Edit HTML
6. By pressi9ng CTRL + F on your keyboard, search for </head>
7. Just above this, paste the code you copied earlier in step 4 and save your template.
You just successfully installed google analytics code on your site and should start seeing tracking reports in your google analytics dashboard in about 24 hours.
[Continue reading]
Friday, 23 March 2012

Add Floating Share Buttons To Your Blog’s Sidebar (For Blogger)

Comments
Apart from working on traffic and search engine optimization (SEO), there’s a need to intergrate your blog with popular social networking platforms. A floating share buttons (social bookmarking) widget by the right of every page is just one of the gadgets you must add to your blog if you intend to get free traffic from facebook and twitter. Underestimating the power of share buttons is like neglecting a major source of traffic to your blog.
Having a floating share buttons widget makes it even easier for your blog visitors to share your blog posts they find interesting. Unlike the previous ones, it’s easy to get this done as you won’t need to do any sort of HTML editing on your template. The floating sidebar sharing widget comes with the most popular social sites. You can see the widget just at the right side of this page and it scrolls with the page, leaving your visitor no choice but to share your content.


1. Log in to your blogger account and click on Design
2. You’re now looking at your blog’s layout, right? Click on Add A Gadget on the sidebar.
3. Select HTML/Java Script
4. Paste the code below into the box and save. There’s no need for a title.

<!--SideBar Floating Share Buttons Code Start-->

<style>
#pageshare {position:fixed; bottom:15%; right:10px; float:left; border: 1px solid black; border-radius:5px;-moz-border-radius:5px;-webkit-border-radius:5px;background-color:#eff3fa;padding:0 0 2px
0;z-index:10;}
#pageshare .sbutton {float:left;clear:both;margin:5px 5px 0 5px;}
.fb_share_count_top {width:48px !important;}
.fb_share_count_top, .fb_share_count_inner {-moz-border-radius:3px;-webkit-border-radius:3px;}
.FBConnectButton_Small, .FBConnectButton_RTL_Small {width:49px !important; -moz-border-radius:3px;-webkit-border-radius:3px;}
.FBConnectButton_Small .FBConnectButton_Text {padding:2px 2px 3px !important;-moz-border-radius:3px;-webkit-border-radius:3px;font-size:8px;}
</style>
<div id='pageshare' title="Share This With Your Friends">
<div class='sbutton' id='gb'><script src="http://connect.facebook.net/en_US/all.js#xfbml=1"></script><fb:like layout="box_count" show_faces="false" font=""></fb:like></div>
<div class='sbutton' id='rt'><a href="http://twitter.com/share" class="twitter-share-button" data-count="vertical" >Tweet</a><script src='http://platform.twitter.com/widgets.js' type="text/javascript"></script></div>
<div class='sbutton' id='gplusone'><script type="text/javascript" src="https://apis.google.com/js/plusone.js"></script><g:plusone size="tall"></g:plusone></div>
<div class='sbutton' id='su'><script src="http://www.stumbleupon.com/hostedbadge.php?s=5"></script></div>
<div class='sbutton' id='digg' style='margin-left:3px;width:48px'><script src='http://widgets.digg.com/buttons.js' type='text/javascript'></script><a class="DiggThisButton DiggMedium"></a></div>
<div class='sbutton' id='fb'><a name="fb_share" type="box_count" href="http://www.facebook.com/sharer.php">Share</a><script src="http://static.ak.fbcdn.net/connect.php/js/FB.Share" type="text/javascript"></script></div><br/><div style="clear: both;font-size: 9px;text-align:center;"><a href="http://http://www.tripozia.blogspot.com/2012/03/add-floating-share-buttons-to-your.html" target="blank"><font color="black">[Get This Now]<font></font></font></a></div></div>


<!--SideBar Floating Share Buttons Code End-->

5. Save the widget and preview your blog.
If you already have a google plus button above or below your posts, the one in the widget might not appear. It seems you can’t have two +1 buttons on a page.
If you’re using a dark template, you can try out the code below if you don’t quite like the first one:


<!--SideBar Floating Share Buttons Code Start-->

<style>
#pageshare {position:fixed; bottom:15%; right:10px; float:left; border: 1px solid black; border-radius:5px;-moz-border-radius:5px;-webkit-border-radius:5px;background-color:#000000;padding:0 0 2px
0;z-index:10;}
#pageshare .sbutton {float:left;clear:both;margin:5px 5px 0 5px;}
.fb_share_count_top {width:48px !important;}
.fb_share_count_top, .fb_share_count_inner {-moz-border-radius:3px;-webkit-border-radius:3px;}
.FBConnectButton_Small, .FBConnectButton_RTL_Small {width:49px !important; -moz-border-radius:3px;-webkit-border-radius:3px;}
.FBConnectButton_Small .FBConnectButton_Text {padding:2px 2px 3px !important;-moz-border-radius:3px;-webkit-border-radius:3px;font-size:8px;}
</style>
<div id='pageshare' title="Share This With Your Friends">
<div class='sbutton' id='gb'><script src="http://connect.facebook.net/en_US/all.js#xfbml=1"></script><fb:like layout="box_count" show_faces="false" font=""></fb:like></div>
<div class='sbutton' id='rt'><a href="http://twitter.com/share" class="twitter-share-button" data-count="vertical" >Tweet</a><script src='http://platform.twitter.com/widgets.js' type="text/javascript"></script></div>
<div class='sbutton' id='gplusone'><script type="text/javascript" src="https://apis.google.com/js/plusone.js"></script><g:plusone size="tall"></g:plusone></div>
<div class='sbutton' id='su'><script src="http://www.stumbleupon.com/hostedbadge.php?s=5"></script></div>
<div class='sbutton' id='digg' style='margin-left:3px;width:48px'><script src='http://widgets.digg.com/buttons.js' type='text/javascript'></script><a class="DiggThisButton DiggMedium"></a></div>
<div class='sbutton' id='fb'><a name="fb_share" type="box_count" href="http://www.facebook.com/sharer.php">Share</a><script src="http://static.ak.fbcdn.net/connect.php/js/FB.Share" type="text/javascript"></script></div><br/><div style="clear: both;font-size: 9px;text-align:center;"><a href="http://www.tripozia.blogspot.com/2012/03/add-floating-share-buttons-to-your.html" target="blank"><font color="white">[Get This Now]<font></font></font></a></div></div>
<!--SideBar Floating Share Buttons Code End-->


For WordPress users, You can check this post – Floating Share Buttons To WordPress

These floating sidebar share buttons will surely make you get more facebook likes. Share this post if you find it helpful.
[Continue reading]
Tuesday, 20 March 2012

Change Your Blogger’s Blog Favicon ( site icon )

Comments
A favicon (short for ‘favorites icon’), is the little icon associated with a particular website or webpage, shown next to the site’s name in the URL bar of most browsers.
Giving your blog an identity really matters and the default blogger icon makes your blog look like just any other blog around. To change the favicon, you first need to create a .png or .ico image about 16X16 or 32X32 pixels and upload it on image hosting sites like tinypic.com, but I actually prefer uploading my stuffs to opendrive.com

You can use any other site you know as long as you can hotlink the image url.
1. Create a .png image about 16X16 with your image editing software or you can create a favicon online from Genfavicon.com or Favicon.cc.
2. Upload your icon to a host and make sure you have the direct image url.
3. Login to your blogger account and click on design
4. Click on Edit HTML
5. Press CTRL + F and serch for
<title><data:blog.pagetitle/></title>
6. Paste your icon url in the line just below it as shown in the image below

7. Save your changes.
Now view your blog and you’ll find out the default blogger ‘B’ logo is replaced by your new image.
[Continue reading]

How To Make Your Blog Load Faster

Comments
Have you ever wondered why your blog has a high bounce rate? A “bounce visit” simply means a single page visit and this might be injurious to the growth and popularity of a blog. Are you asking what the heck bounce rate means? Bounce rate is calculated as the percentage of single page visits in relation to the total number of visits.

When your blog takes too long to load, visitors might be discouraged from proceeding and decide to close the tab. I often do that especially when I’m on a slow connection. When building a blog, a lot of things must be put into consideration and this includes visitors on slow connections. You might think everything is alright if you’re on a pretty fast LAN connection but try to load your blog using a slow dial-up connection before concluding.
Several things things can contribute to a high bounce rate ranging from low quality contents to lack of internal links and so on but excessively long page load time is one of the major contributors.
To reduce page load time:
1. Be sure you don’t use too much javascripts on external servers. Scripts place on a slow external server will definitely increase your blog’s page load time.
2. Images quite make a blog look attractive but the size and resolution must be moderate.
3. You should realize that you can’t use all the available blogger widgets, select only the important ones.
4. Always check your blog in all popular web browsers after every change you make.
5. If you’re using a custom blogger template, you can upload those images used in styling the template in a blog draft post and replace the links in the template. Some are some are uuploaded on external servers like tinypic and the rest of them. Check your template and change them if you can.
6. Always check your google analytics account to know when you have a problem with bounce visits.
With these little tips, your blog will surely load faster.
[Continue reading]

How To Install/Upload Blogger Templates

Comments
I assume you are new to this blogging thing else you won’t be reading this. Installing custom blogger templates is very crucial if you intend to have a good looking blog. Default blogger templates give your blog some sort of unprofessional look. Installing custom blogger templates gives your blog some sort of identity.
These templates often come in zip folders containing probably a “read me” file, an installation guide and a file in .xml format. Unzip the contents and follow this simple installation guide:
1. Go to “Design” and select “Edit HTML”

2. In case something goes wrong or you intend to revert the design, always back up/download your present template before making any changes.

3. Now locate the xml template you unzipped earlier and upload.
4. That’s all. You’re done.
Now there might be some changes you might want to make in the template. You might want to change the header links. Go to Dashbard > “Design” > “Edit HTML”
In most cases, you can search for this code:
<li class='current'><a expr:href='data:blog.homepageUrl'>Home</a></li>
<li><a expr:href='data:blog.homepageUrl + &quot;feeds/posts/default&quot;'>Posts RSS</a></li>
<li><a expr:href='data:blog.homepageUrl + &quot;feeds/comments/default&quot;'>Comments RSS</a></li>

<li><a href='#'>Edit</a></li>

You can replace expr:href= with href=”mylinks”
This applies to some templates I uploaded here. You can as well search for ant of the title in the deader links. Let’s assume there’s a link in the header titled “CONTACT”, you can serch for this exact query in your template’s html and replace the link.
Now, some templates also come with the header image or site logo embedded in the html. You might need to find the image link and replace with your image link in some cases.
[Continue reading]
Wednesday, 29 February 2012

Where To Start Your Own Blog

Comments
Do you want to start your very own blog just like Tripozia? You can do this totally for free. To do this, you only need a little knowledge of how to operate a computer and if not wide but a little knowledge of how to use Microsoft® Office Publisher and Microsoft® Word because you will use some of the knowledge from both softwares to learn to construct your own blog.
Visit any of the following to start your own blog:

Blogger: Blogger is the most famous of all host and own by google. They are easy to use with simple editing tools. Your can start with them for free with a sub-domain and later (if you want to) buy your own domain. To start with them now, visit www.blogger.com

Wordpress: Wordpress is complex and very flexible. I like them because they provide more features. But the disadvantage is that it is more slower in loading and can only be enjoyed on fast connections. Your can start with them for free with a sub-domain and later (if you want to) buy your own domain. To start with them now, visit www.wordpress.com

Please do not go without leaving a comment. This will make us improve!
[Continue reading]
Loading