Showing posts with label Mobile tips. Show all posts
Friday, 6 April 2012

Read Nokia Security Code Through USB

Comments
Perhaps you changed your Nokia phone security code in a hurry and forgot the next time you’re to use the phone. It might even be that someone else did or you might just decide to read someone else’s phone security code. Whatever the case may be, this tutorial explains how to read a Nokia phone existing security code without necessarily changing it back to the default 12345 or flashing the phone.
[ANT] Simple is a tiny program that reads the security code of any Nokia phone that supports USB connection mode.
1. Downoad [ANT] Simple
2. If you have Nokia PC Suite running, be sure to close it by exiting from the taskbar icon.
2. Extract [ANT] Simple ] and run Simple.exe located in the folder
4. Connect the phone vis USB to the computer
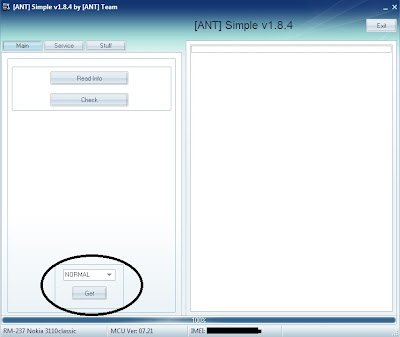
4. On the MAIN tab, click on GET. Your phone IMEI number and model should be displayed on the bottom panel as shown below

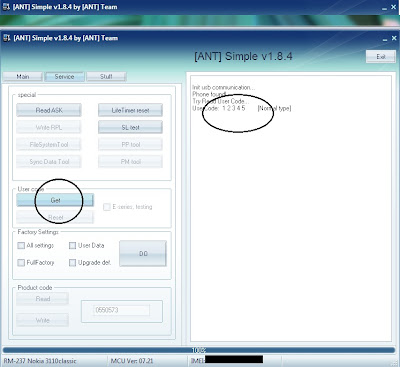
5. Now click on the SERVICE tab and click on GET button under USER CODE

6. Your security code should now be dispalyed on the right side of the application waindow.
Download [ANT] Simple from Hotfile
[Continue reading]

Nokia Secret Codes And Tricks

Comments
On the main screen or standby, type any of these codes to use them.
*#06# – this displays the unique serial number or IMEI number of your phone
*#0000# – it displays the firmware or software version details
*#2820# – displays bluetooth (BT) device address
Press and hold the ZERO (0) button – starts your default browser and launches your defined hompage
Press and hold the MENU button – This starts the phone task manager where you can switch between running applications. Pressing the CANCEL (c) button terminates a running application.
*#7780# – This Restores user defined settings to factory default settings. Programs, calendars, and contacts are unchanged. You will be ask to input your security or lock code to proceed with the restoration.
*#7370# – Reprograms your phone memory to factory default. all files will be deleted. you will be ask to input your security or lock code to proceed with the phone memory format. backup your messages, contacts, and other important data before proceeding. NOTE: this is equivalent to hard format for Nokia Series 60 1st edition phones (N7650, N3650/60, N-Gage/QD). If you are using Nokia Series 60 2nd and 3rd edition phone (N6600 and above), this code will not fully format your phone memory, you need to do the hard format (4-keys combo code) instead.

*#7370925538# – reprograms your phone’s wallet application. all information on your wallet will be erased and the wallet code will be removed.
[Continue reading]
Monday, 2 April 2012

How To Root Or Unroot Any Android Device [Easiest Guide]

Comments
Hi friends! If you are always tired of rooting phone again and again cause of new updating circumstances then we have a great news about to get freedom from this.
Recently we found an easy and common way to root or unroot our android devices. Often there are separate procedures to root android phones. But now XDA developers generates a procedure of rooting and unrooting the phone that is perhaps common for all android devices.

Yes my friends now you can root and unroot your phone just like playing a game or we can the easiest way for this task.

Short description about easy rooting toolkit


  • Creator of this method- Doomlord (an XDA developer)
  • Moto of this method- To root/unroot any android device

Note: Actually this method of rooting is firstly created for Sony Ericson devices but when this method is applied on other phones, it works same as for Sony Ericson devices.
I suggest you to visit official xda thread before doing anything with your phone


Devices that tested bwith this method :


  • Sony Xperia X10 (GB firmware)
  • Sony Xperia Arc (.42 firmware)
  • Sony Xperia Arc S
  • Sony Xperia Play [R800i/R800x]
  • Sony Xperia Ray
  • Sony Xperia Neo
  • Sony Xperia Mini
  • Sony Xperia Mini Pro
  • Sony Xperia Pro
  • Sony Xperia Active
  • NTT Docomo Xperia ARCO SO-02C
  • Samsung Galaxy S2 [GT-i9100/GT-9100P]
  • Samsung Galaxy S II for T-Mobile (SGH-T989)
  • Samsung Galaxy S II for AT&T (SGH-I777), Skyrocket (SGH-i727)
  • Samsung Galaxy S II LTE Rogers Canada (SGH-I727R), Android version 2.3.5, Baseband version I727RUXKJ7
  • Samsung Galaxy S II Epic 4g Touch
  • Samsung Galaxy S2 HD LTE (SHV-E120S)(korea)
  • Samsung Galaxy i9100G
  • Samsung Galaxy S [i9000B] & [i9000 2.3.3 (PDA I9000BOJV8, Phone I9000XXJVO, CSC I9000GDTMJV7) and german T-Mobile branding]
  • Samsung Galaxy S Plus (GT-I9001) OS 2.3.3 and 2.3.6 (I9001ZSKP6)
  • Samsung Galaxy Mini GT-S5570 (GB only)
  • Samsung Galaxy Mini Pro i5510
  • Samsung Galaxy W [i8150]
  • Samsung Galaxy Y
  • Samsung Galaxy Tab [P1000] (2.3.3 firmware), [P1000N]
  • Samsung Galaxy Note [N7000]
  • Samsung Galaxy Player YP-G70 2.3.5 (GINGERBREAD.XXKPF)
  • Samsung Galaxy Ace (2.3.3, 2.3.4 firmware)
  • Samsung Nexus S [i9023] (2.3.6)
  • Samsung Nexus S 4G 2.3.7
  • Samsung Galaxy Nexus S [i9020] (2.3.6)
  • Samsung Exhibit (SGH-T759)
  • Samsung Exhibit 4G (SGH-T759) (2.3.3) Build UVKE8
  • Samsung Captivate i897 UCKH3
  • Motorola Milestone 3 [ME863 HK]
  • Motorola XT860, Bell XT860
  • Motorola Defy+
  • Motorola Droid X sys ver 4.5.605 w/ gingerbread
  • Motorola Droid X2 (2.3.4) Sys ver 1.3.380.MB870.Verizon.en.US Build 4.5.1A-DTN-150-30
  • Motorola XT883 (China Telecom)
  • Motorola XT862 (Verizon Droid3)
  • Motorola DROID RAZR
  • Nexus One (2.3.6 stock)
  • LG Revolution
  • Vizio VTAB1008 Tablet
  • Huawei IDEOS U8150 (2.2)

So let’s check out how to root any android phone with one click

[1]. First Download:


Easy ROOTING Toolkit from HERE Or via multiupload


[2]. Before rooting your android phone make sure you have :


  • installed adb drivers for your phone, you can download drivers for xperia phones from here
  • Now go to Menu>Settings>Applications and “enable unknown sources”  homesettingssettings application
  • Also enable “USB DEBUGGING” by going to Menu>Settings>Applications>Development  homesettingssettings applicationsettings application developement
  • [OPTIONAL] increase screen timeout to 10 minutes , so you can see what’s happening
  • connect your phone to pc with help of usb cable

[3]. Rooting your android phone with easy rooting toolkit


  1. First Extract rooting kit to any safe place like desktop
  2. Double click on “runme.bat”run-doom-lords-run-me-bat
  3. It will run rooting script and you will see a command prompt like belowfirst-cmd-image
  4. Now connect your phone to pc
  5. Once your phone successfully connected to pc , hit any key to start rooting.It will complete in few seconds . During this process don’t close command prompt or don’t disconnect your phone
  6. on completion your phone will reboot , and “ALL DONE!!” message will appear in command prompt that means your phone rooted successfully
  7. Now you can press any key to close it

Congratulations you have successfully rooted your android phone , now you can enjoy your phone’s full potential.


In case if you want to unroot your phone , you can unroot it too

Note: unroot only if you rooted your phone with above method otherwise it can damage your phone.


[1]. First Download:


Unrooting pack

[2]. Procedure to Unroot your phone:


  1. Unzip the above downloaded file named “UNROOTING SCRIPT v1.0”.
  2. Now open the extracted folder and launch the file named “RUNME-UNROOT.bat”.
  3. Now follow the on screen instructions.

Warning:
    Performing the unroot procedure again and again is on your own risk.

Enjoy! And have fun with the new easiest and common method to root/unroot any Android devices.
[Continue reading]
Friday, 30 March 2012

Blogger Application For Android And iPhone – Blogging On The Go

Comments
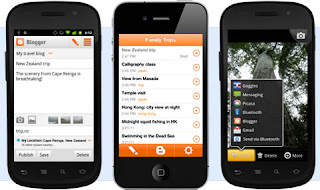
Blogger has made it possible for all Android and iPhone user to blog with their phone with the use of Blogger Application
With this application you can make a new post, attach images, including location, publish to your blog, save as draft, send via Bluetooth to friends and email to friends and many other feature.
Features Of Blogger App
Post to your blog from
anywhere

Instantly publish posts to your blog or save them as drafts.
List view
Quickly navigate to blog posts and drafts from an easy-to-read list.
Attach photos
Include photos in your blog post by taking a picture with your camera within the Blogger app or choosing one from your gallery.
Share your location
Select your current location from the My Location bar and add it to your post.
Share to Blogger
Send links and photos directly to your blog by selecting Blogger from the options menu of apps like your web browser and photo gallery.
Install Blogger App For Android
Install Blogger App For iPhone.
Hoping to see this kinda Blogger app for Nokia users too soon.
Consider sharing this post.
[Continue reading]
Thursday, 29 March 2012

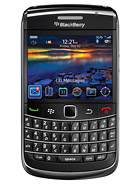
Blackberry Users “Unable to validate the email address and password combination ” error in BlackBerry App World Get It Solved

Comments
Couple of months back, I bought my Blackberry phone, downloaded a few apps and after some time, I just couldn’t access Blackberry AppWorld anymore. Whenever I try to log into the Blackberry AppWorld, I either see “Unable to validate the email address and password combination” or “An error has occurred. Please try again later“. After doing some research, I stumbled on some solutions which I tried and right now I can now access my Blackberry AppWorld account. Hence, I have decided to share with you how I fixed the errors, should in case you are experiencing similar problems.

The first thing I did was to ensure that the date/time settings on the BlackBerry® smartphone are set to the correct date, time, and time zone.
My BB runs on Blackberry Device Software 6.0. Hence for me to carry out the fix above, from the Home screen of the BlackBerry smartphone, I clicked Options > Display > Date and Time > and set the Update Time field to Automatic.
Thereafter,I pressed the Menu key, and selected “Update Time“. I pressed the Menu key, and selected Save, to save the settings.
After setting the date/time, I reset my BlackBerry ID password from the BlackBerry App World application.
To reset it the way I did, click the “Forgot Password?” link from the BlackBerry ID login screen of your Blackberry Appworld application.
==> Enter the email address associated with the BlackBerry ID account.
==> Enter the answer to the security question that was created during the BlackBerry ID account creation.
==> A prompt will then indicate that a reset email has been sent to BlackBerry ID email account. Open the email and click on the included link to reset the password.
==> Click the link to reset the password and a webpage will open to the password reset information page. Then enter the answer to the security question that was created during the BlackBerry ID account creation process and enter the new password in the two password fields provided. When completed, click OK to continue.
That’s all.
If you try the two solutions above, you should be able to solve problems associated with logging in to your Blackberry AppWorld account.
If the two solutions above still can’t solve your problem, check out the BlackBerry Technical Solution Center
Cheers!
[Continue reading]

Blackberry ID Locked? See How to change or reset a BlackBerry ID password

Comments
To change the BlackBerry® ID password, complete the following:
From a Computer:
  1. Visit www.blackberry.com/blackberryid from a PC or a device browser
  2. Click Log in
  3. Enter the BlackBerry ID Username (email address) and password, then click Sign In
  4. Click Account Details
  5. Next to Password, click Edit
  6. Enter in the current password, followed by the new password. Enter the new password again in the confirm password field, then click Save
  7. Click Done to exit from the BlackBerry ID account information screens
From a BlackBerry smartphone with device software 6.0:

  • Navigate to Options > Third Party Applications > BlackBerry ID
  • Click on Change next to BlackBerry ID Password
  • Enter in the current password, followed by the new password. Enter the new password again in the confirm password field, then click OK
  • A confirmation message will display Your password has been successfully changed.
  • Click OK
From a BlackBerry smartphone with device software 7.0 and 7.1:

  • Navigate to OptionsDevice > BlackBerry ID
  • Click on Change next to BlackBerry ID Password
  • Enter in the current password, followed by the new password. Enter the new password again in the confirm password field, then click OK
  • A confirmation message will display Your password has been successfully changed.
  • Click OK
From a BlackBerry Playbook with Playbook software 2.0:

  • Navigate to the Options icon
  • Select BlackBerry ID
  • Click on the edit button next to Change Password
  • Enter in the current password, followed by the new password. Enter the new password again in the confirm password field, then click Submit
  • A confirmation message will display You have changed your password. 
  • Click OK


If the password for a BlackBerry® ID account has been forgotten and the login is unsuccessful, please use the following process to reset the password.
To generate a password reset email, please follow these steps:
  1. Browse to the following location using the BlackBerry browser or desktop browser: http://blackberryid.blackberry.com/bbid/recoverpassword
  2. Enter the BlackBerry ID email address and the CAPTCHA characters, then click Submit >
  3. A confirmation message will display A password reset email has been sent to email@domain.com, at which point, a reset email will be delivered to the BlackBerry ID email address. 
Note: For security purposes, this reset email will NOT be delivered to the BlackBerry smartphone.

To reset the BlackBerry ID, please follow these steps:

  1. Login to the email account associated to the BlackBerry ID using the desktop browser or the browser on the BlackBerry PlayBook
  2. Locate the BlackBerry ID password reset email in the inbox and select the link within the email
  3. The BlackBerry ID reset email will come from bbidpw-donotreply@blackberry.com. If the email is not found in the inbox, please check your spam folder.
  4. When the password reset page loads, enter the new password along with a confirmation of that new password. Then click Submit >
  5. A confirmation message will display once the changes have been saved successfully
[Continue reading]
Wednesday, 18 January 2012

Hack Symbian Phones ( S60V3, S60V5, ^3 and Anna ) Without Cert And Key

Comments
(Update – if you think this post is too complicated, try the new, easier one)
As of June 2011, the only known method of hacking a symbian phone is by using a cooked firmware. There are several methods on the internet about hacking symbian phones without key and certificate but most of these methods only work for S60V3 and some S60V5 symbian phones. The method in this tutorial can hack any phone using symbian operating system ranging from S60V3, S60V5, Symbian ^3 and Symbian Anna. This hacking is permanent as you have to customize your own hacked firmware and your phone will still remain hacked even if your restore factory settings a thousand times over.
There was a previous post I made on using free signer to sign your symbian applications but this is now practically useless as OPDA and other symbian certificate and key issuing sites are no longer working. Also if you are using a S60V3 phone with operating system 9.1, I suggest you check this post on using Quick Hack Kit instead of going through this.
To hack your symbian phone without certificate and key, you need to have the following tools:
1. Nokia OVI Suite or Nokia PC Suite
2. Installservers for Symbian OS 9.1, 9.2, 9.3 & 9.4
3. NavifirmPlus – this is used to download original nokia firmwares.
3. Nokia Cooker – for creating hacked UDA.
4. Phoenix Service Suite – for flashing symbian phones through USB cable as earlier posted here.
5. NFE Core 2 – for packing & repacking rofs/core.
6. Rompatcher plus – for applying useful patches.
7. For Cooker Files
Instead of downloading the files separately, you can download Required Tools.rar (97MB) which has NavifirmPlus, NokiaCooker, NFE Core 2 and Phoenix Service Suite Included.
Now follow the steps carefully
1. In standby mode press *#0000# and note your phone type, eg. RM-419
2. Remove the battery and check the back of the phone to know the product code labelled with the term CODE
3. With a steady internet connection, open NavifirmPlus
4. Search for the product [RM-xxx] that matches your phone model.
5.Now select the firmware version and download the firmware in accordance with the product code of your mobile to your computer.

Note: The files you just downloaded are the original firmware files of your phone and you should back them up so you can flash your phone with these files in case something goes wrong though I’m sure it shouldn’t.
6. Launch NFE Core 2 then Click on Open

7. Select the file with this extension rmXXX_XXX.XXX_prd.core.fpsx then click Open

8. Check Keep the oldCRC32 & click Unpack

9. Click Yes on the dialogue box that pops up.

10. When it shows Unpack Complete, click on ROFS Callibration

11. The ROFS Calibration should be done as seen in the screenshots below:

12. Repack as shown below

13. After the ROFS file is created, exit the program.

That looks like the first phase of the whole process, now let’s proceed.
14. Open Nokia Cooker v1.1. (Backdate your PC, I backdated mine to the current date & month and set the year to 2000. You should do this else it will show a message that says the program is outdated)

15. Click on Open Firmware, then go to the location of the downloaded firmware files and open a file with an extension that looks like “prd.rofs2.fpsx”. Now you should be able to see some folders inside Nokia Cooker Window.

15. Replace the folders as seen in the screenshoot below. [Open the Tools Folder- Open For Cookers Folder then drag the four folders & replace with the ones in NokiaCooker]!!! When i tried replacing, no action was made so i opened each folder & did the same to the ones in For Cookers Folder. I then started doing it one by one [e.g. On Nokia Cooker, Click on SYS Folder, Click on BIN Folder then it displays what is inside BIN Folder on the right side of the window, now open For Cookers Folder, Open SYS Folder, Open Bin Folder, Drag all tha files inside to NokiaCooker (the Bin Folder Open). Do the same for all other Folders & Files too.... After Dragging & Dropping, Drag and Drop Installserver.exe compatible with your phone to SYS\BIN Folder [Open the Installserver Folder & Select the one compatible with your phone then drag it to Sys/Bin Folder]. I used OS 9.3/9.4 because my phone is an FP2 device!
NOTE:- FP1 devices uses OS 9.2 why Pre-FP1 devices uses OS 9.1. All S60v5 or ^1 devices uses OS 9.4 & the Latest OS which is ^3 & Anna uses ^3!!! To get your OS type, goto http://www.gsmarena.com, type your phone model in the search box located at the top right corner and click on Go. When it shows the device INFO, scroll down to OS Label & check.

16. You just created a hacked UDA which will be used to flash your symbian smartphone.

17. Copy all the firmware files except the one just created taggged BACKUP to C:\Program Files\Nokia\Phoenix\Products\RM-XXX. You should create the RM-XXX folder according to your phone type.
18. Connect your phone using your USB cable in PC Suite Mode
19. Open Phoenix Suite
20. The Phoenix Suite will recognize your phone’s RM code with the corresponding USB Port.
21. Now go to File and Select “Scan Product”.
Your phone’s RM code, firmware version and other information will now be displayed at the bottom of the phoenix window.

22. Make sure that the Operating Mode is set to Normal.
23. Now on the menu bar, go to “Flashing” and Select “Firmware Update

24. A new pop up window will open inside the phoenix suite which will show you the Product Code, Software version and variant version.
25. Now select refurbish to start the flashing process.

26. The last stage.

27. Disconnect your USB Cable,
- Go to Installation
- Launch Rompatcher [this hack method has rompatcher embedded along with the hacked UDA so there's no need to install rompatcher]
- Apply the open4all patch & press Options, then select Add to Auto for accessing system folders.
- Apply the open4all patch & Press Options then Select Add to Auto for installing any unsigned/signed apps in your hacked symbian operating system.
28. Install X-plore
-Launch X-plore
-Press Menu > Tools > Configuration
-Tick all the boxes but the image & font boxes are optional
-Click Back
-Goto C:\ & Open
You should see patches folder there, just scroll to the folder and press Menu – Scroll down to Edit then click on Move & move is to E:\
This symbian operating system hack method works on Symbian S60V3, S60V5, ^3 & Anna. Enjoy your hacked smartphone and leave a comment below.
[Continue reading]

Easy Way To Hack Your Nokia Or Sony Ericsson Symbian Phone Without Flashing

Comments
I wrote a post on permanent hacking for symbian phones but I saw that the method is quite complex and the process was just too risky and complicated. Also it worked only on Nokia phones only and you definitely need a PC to do it. The method I’ll be posting today is quite easy and you can hack your symbian Nokia or Sony Ericsson phone without a computer, a developer key and certificate. The method was tested on Nokia C-7, Nokia N8, Sony Ericsson Vivaz, Satio and a host of other symbian phones ranging from symbian ^3, symbian anna, symbian s60v5 and s60v3. Now it’s possible to hack your symbian phone without a necessarily flashing the phone.
You can’t fully utilize the power of your Symbian smartphone if the phone isn’t hacked yet. Hacking your phone allows you to install unsigned applications and applicatios with expired certificates. You can easily bypass installation error messages such as “certificate error,” “certificate expired” and so on.

Unlike the method I posted earlier, you have to perform this symbian hack on your mobile phone and ther’s absolutely no need for a computer. First download these files:

UMUNokiaHack.sisx

UMUSonyEricssonHack.sisx

RomPatcherPlus_3.1.sisx

InstallServers_Pack.zip

x-plore_s60_3rd_1_53.sisx
1. Depending on whether you’re using a Nokia or Sony ericsson symbian phone, download UMUNokiaHack or UMUSonyEricsson Hack and install. Launch the application
2. Select your desired connection. Here you can select wi-fi or your default access point
3. Accept the trial key and accept the trial license too
4. Select Yes
5. Next, select No, then OK
6. Select OK and press 123. Now re-type 123 once more
7. Choose Options and click on Antivirus
8. Go to Quarantine
9. Press Options > Restore > Yes
10. Click Back, Home, then Exit and uninstall UMU Mobile Security immediately.
11. Enter 123 when prompted.
12. Now install RomPatcherPlus_3.1.sisx
14. Launch it and apply Open4All. This gives you access to all folders including system folders
15. Apply Installserver. Now you can install all unsigned applications.
NOTE: If you see something like a red cross, then you still have one more thing to do. There’s a link to installservers pack earlier in this post and this is where to use it.
To know which installserver to use, you need to know your phone’s operating system. Go to www.gsmarena.com and run a search for your phone to know the operating system and other details. Below is just an overview of what the installservers pack contain and corresponding phones they work for.
by swmail:
installserver91: for E60, E61i, E62, E65, E70, N71, N73, N75, N77, N80, N91, N91, N92(Symbian 9.1)
installserver92: for E51, E90, N76, N81, N81 8GB, N82, N93, N93i, N95, N95-2, 6290, 5700, 6120, 6110, i520, i550, i400, i450, i560, G810, N78, N96, 6220(Symbian 9.2, 9.3)
installserver3250: for 3250
installserver5500: for 5500
installservere50: for E50
installservere61: for Е61 or 3250 (if first file wont work only)
by PNHT:
installserver934: for newest 9.3 and all 9.4 models
by CODeRUS:
installserverS3: for all Symbian^3 (and Symbian Anna, Symbian Belle)
* Check the installsever compatible with your phone
* With X-plore or any other file manager you have, copy the installserver to to C:\sys\bin
* There’s no need to apply installserver patch in RomPatcher and your phone is now hacked.
This hack works on symbian Anna, symbian ^3, symbian s60v5 and probably s60v3. It works on Sony Ericsson Vivaz as well and I’ve read reports that it also works on Satio too.
All credits to Coderus for sharing this easy approach to symbian hacking.
[Continue reading]
Loading